

Upgrade to Cordless Shades: Style, Safety & Savings
TL;DR:
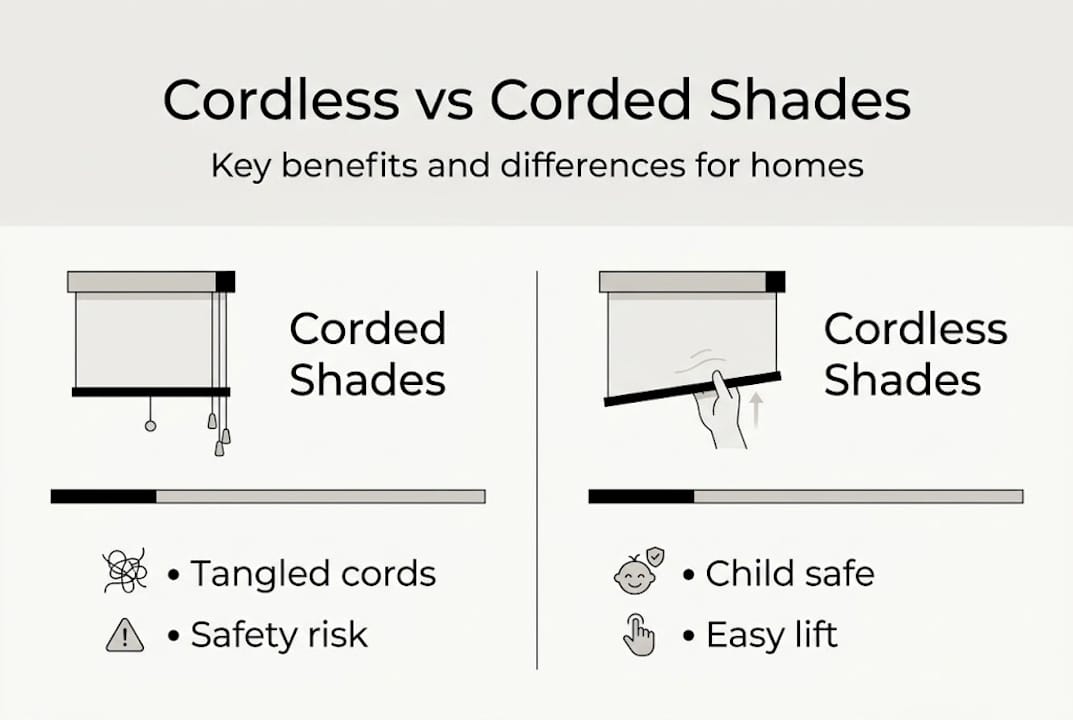
- Cordless shades improve safety, energy efficiency, and aesthetics by eliminating cords and improving insulation.
- Cellular shades provide exceptional insulation, reducing heat loss by up to 60 percent.
- Easy DIY installation allows homeowners to upgrade window treatments confidently and cost-effectively.
Tangled cords, energy bills that creep up every winter, and window treatments that just look tired. If any of that sounds familiar, you’re not alone. Traditional corded shades create real hazards for kids and pets, let conditioned air escape through thin fabric, and leave your windows looking like an afterthought. Upgrading to cordless shades fixes all three problems at once. Double-cell models reduce heat loss by up to 60%, which means a meaningful drop in your monthly utility costs. This guide walks you through every step: assessing your current setup, picking the right style, measuring correctly, and installing with confidence.
Table of Contents
- Assessing your current window treatments and goals
- Choosing the best cordless shade style for your needs
- Preparing for a successful cordless shade installation
- Step-by-step: How to upgrade to cordless shades
- What most homeowners get wrong about cordless shade upgrades
- Ready to transform your home with cordless shades?
- Frequently asked questions
Key Takeaways
| Point | Details |
|---|---|
| Cordless shades boost safety | Removing cords means peace of mind for homes with kids and pets. |
| Upgrades save energy and money | Cellular cordless shades slash energy bills by trapping heat in winter and blocking it in summer. |
| Easy customization and style | Choose the ideal shade style, fabric, and color for any room’s needs. |
| DIY-friendly installation | Most cordless shades can be measured and installed by homeowners in a weekend. |
Assessing your current window treatments and goals
Before you spend a dollar, take a close look at what you already have. Walk from room to room and inspect each window covering honestly. You’re looking for specific red flags that signal it’s time to upgrade.
Here’s what to watch for:
- Frayed or tangled cords that are difficult to operate or hang loosely near the floor
- Faded or sun-bleached fabric that no longer blocks UV rays effectively
- Stiff or uneven operation where the shade bunches on one side
- Cold drafts near windows in winter, which point to poor insulation in your current treatments
- Cords within reach of children or pets, which is a genuine safety concern
Cordless options are strongly recommended for homes with children or pets because they remove the strangulation risk posed by hanging cords entirely. If you have young kids or curious animals, this alone is reason enough to upgrade. You can also read more about child safety with cordless shades to understand how the right treatments protect your household.
Once you’ve spotted your pain points, match them to a clear goal. Most homeowners fall into one or more of these categories:
- Safety first: Eliminating cord hazards for kids and pets
- Energy savings: Reducing heating and cooling costs with insulating shades
- Modern aesthetics: Replacing dated treatments with a cleaner, tailored look
- Smart home integration: Preparing for motorized or app-controlled operation
Here’s a quick comparison to help you see the full picture:
| Feature | Corded shades | Cordless shades |
|---|---|---|
| Child and pet safety | High risk | Very safe |
| Ease of daily use | Moderate | Excellent |
| Aesthetic appeal | Cluttered look | Clean, minimal |
| Energy efficiency | Basic | High (cellular options) |
| Maintenance | Cord tangles, breakage | Minimal upkeep |
| Upgrade path | Limited | Motorization-ready options |
This exercise helps you prioritize. If your main issue is drafty windows, you’ll shop differently than someone whose primary concern is modernizing a living room.
Choosing the best cordless shade style for your needs
With your goals clear, it’s time to match them to a shade type. Not every cordless shade performs the same way, and choosing the wrong style for a room can leave you disappointed.
Here are the four most popular cordless shade types and where each one shines:
- Cellular (honeycomb) shades: The top pick for energy efficiency. Their air-trapping pockets insulate your windows far better than any flat fabric. Cellular shades can cut winter heat loss by 46% and summer solar heat gain by 78%, making them ideal for bedrooms, living rooms, and any space where comfort matters year-round. Browse top cellular shade options to see how they look in real rooms.
- Roller shades: Sleek and minimal. These work beautifully in modern kitchens, home offices, and bathrooms. They’re easy to clean and come in blackout or light-filtering options.
- Roman shades: Soft fabric folds give a warm, layered look. Perfect for dining rooms and bedrooms where you want texture without bulk.
- Bamboo and woven wood shades: Bring natural materials and a relaxed, organic feel. Great for living rooms and sunrooms where you want diffused light.
| Shade type | Energy rating | Safety | Style versatility |
|---|---|---|---|
| Cellular | Excellent | Excellent | Moderate |
| Roller | Good | Excellent | High |
| Roman | Moderate | Excellent | High |
| Bamboo | Moderate | Excellent | Moderate |
Room usage should drive your choice. Bedrooms benefit most from blackout cellular shades for better sleep. Living rooms and common areas do well with light-filtering options that soften glare without blocking views. Bathrooms and kitchens need moisture-resistant fabrics.
Customization matters here too. Cell size in honeycomb shades (single, double, or triple cell) directly affects insulation performance. Fabric color influences both aesthetics and how much solar heat enters the room. Lighter colors reflect heat in summer; darker tones absorb it in winter. You can explore premium cordless shade fabrics to find the right combination of color and performance for your space.
For technology, brands like Hunter Douglas, Lutron, and SmartWings lead the market in combining style with smart home integration. If future automation is on your radar, confirm that any shade you choose is motorization-compatible before you buy.
Pro Tip: If you’re upgrading multiple rooms, start with the room that gets the most direct sun or the room where your energy bill pain is greatest. The savings and comfort improvement there will confirm you made the right choice.
Preparing for a successful cordless shade installation
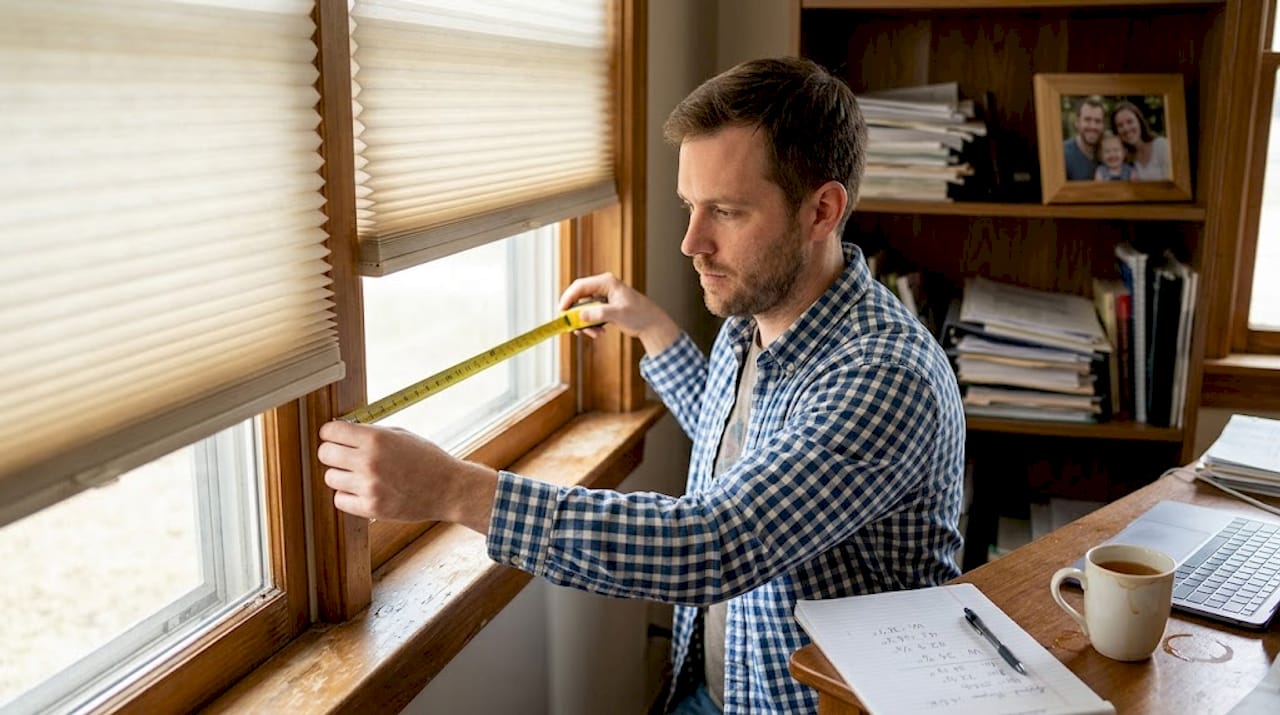
Choosing the wrong shade for the wrong window is frustrating. Choosing the right shade but measuring incorrectly is worse. Proper measurement and prep prevent costly mistakes and installation delays that can set your project back by weeks.
Start with a room-by-room checklist before you order anything:
- Measure each window three times: width at the top, middle, and bottom; height on the left, center, and right. Use the smallest measurement for inside-mount shades.
- Check for obstructions: handles, locks, cranks, or deep sills that affect how far inside the frame a shade can sit
- Decide on mount type: inside mount gives a cleaner look; outside mount covers the full frame and creates a larger appearance
- Note wall and frame material: drywall, wood trim, and concrete all require different anchors
- Confirm window shape: arched or angled windows need special ordering notes
For tools, you’ll need:
- Tape measure (steel, not cloth)
- Pencil for marking bracket positions
- Level to keep brackets even
- Power drill or hand screwdriver
- Mounting hardware (usually included with your shade)
For easy cordless shade installation, look for shades that include pre-assembled brackets and clear printed guides. No-drill options with adhesive or tension mounts are also available if you rent your home or want a damage-free install.
Pro Tip: Before your shades arrive, label a piece of painter’s tape on each window with the room name and window position (for example, “bedroom, left window”). When the boxes arrive, match each shade to its labeled window immediately. This saves real time during install day.
Plan for about 15 to 30 minutes per window depending on your experience level. If you’re installing cellular shades with motorization, add another 10 to 15 minutes to pair the motor with your app or remote.
Step-by-step: How to upgrade to cordless shades
With everything measured and labeled, you’re ready to install. Work one window at a time to stay organized.
- Remove the old window covering: Lower it fully, then unscrew or unclip the mounting brackets. Pull the headrail free and set it aside. Patch any wall holes if needed before mounting new hardware.
- Mark your bracket positions: Hold the new headrail against the window frame at the correct height and depth. Mark the bracket screw holes with a pencil. Use a level across both marks before drilling.
- Mount the brackets: Drill pilot holes (small starter holes to prevent cracking) and secure the brackets with the provided screws. Test each bracket for firmness before moving on.
- Snap in the shade: Slide or click the headrail into the mounted brackets per the manufacturer’s instructions. Most cordless shades snap in from the front or bottom.
- Test the operation: Raise and lower the shade slowly. It should move smoothly with gentle hand pressure and hold its position when released.
- Install motorized shades (optional): After snapping in the shade, insert or charge the motor battery. Download the paired app or sync with a remote. Follow the pairing steps in the instruction guide to set upper and lower stop positions.
Safety note: Always use a stable step stool or ladder when working near upper window frames. Keep children and pets out of the room while tools and hardware are in use.
If your shade raises unevenly, check that both brackets are at the exact same height. For light gaps on the sides, an outside mount may serve you better than an inside mount. If a motorized shade won’t connect, restart your router and repeat the pairing process.
Motorized shades add upfront cost but deliver real returns for hard-to-reach windows and rooms where you want scheduled automation. Studies confirm that automated shades save 20 to 35% of home HVAC energy use annually. Learn more about motorization advantages and how insulating shades cut heating costs with cellular shade insulation tips.
What most homeowners get wrong about cordless shade upgrades
Most people treat a shade upgrade as a style decision and nothing more. They pick a color that matches their wall, grab the lowest price option, and move on. That approach leaves real money on the table.
The honest truth is that cheap shades typically skip the features that matter most. They use single-layer fabric with minimal insulation value, and they’re rarely built to accept motorization later. So when you want to add smart home control next year, you end up replacing the entire shade again.
The smarter play is to treat this as a long-term investment. Choose shades with a higher R-value (a measure of thermal resistance, meaning how well the shade slows heat transfer) and hardware that is already motorization-compatible. The price difference between budget and mid-range shades is often smaller than people expect, but the performance gap is large. Reading through smart energy tips for window treatments shows just how much heat moves through an untreated window.
Spend a bit more now and you gain years of lower utility bills, a safer home, and the flexibility to automate whenever you’re ready.
Ready to transform your home with cordless shades?
You now have the full picture: what to assess, which style fits your goals, how to measure, and how to install. The next move is finding shades that match your vision and your budget without compromise.

At Value Blinds, you can shop cordless window treatments across dozens of styles, fabrics, and colors, all built for straightforward DIY installation. If energy savings are your top priority, explore cellular shades in single, double, and triple-cell options. Not sure where to start? Our window design expertise connects you with specialists who can guide your choices from first measurement to final install. Free swatches are available so you can see and feel the fabric before you commit.
Frequently asked questions
Are cordless shades really safer for children and pets?
Yes, cordless shades eliminate dangling cords entirely, which removes the strangulation risk that corded treatments pose for young children and curious pets. They’re the recommended choice for any household with kids or animals.
How much can I actually save on energy bills with cellular cordless shades?
High-quality cellular shades can reduce heating and cooling energy loss significantly, with double-cell shades cutting heat loss up to 60% and delivering 20 to 35% savings on annual HVAC costs. The exact amount depends on your climate and window size.
Can I install cordless shades myself, or should I hire a pro?
Most cordless shades are designed for easy DIY installation and take 15 to 30 minutes per window with basic tools. Follow the measurement instructions carefully and you’ll get professional-looking results without paying for labor.
What features should I look for in high-quality cordless shades?
Prioritize shades from AERC-rated brands with double or triple cell construction, a high R-value, and hardware that supports motorization so you can upgrade to automation later without replacing the entire shade.


