
How to Change Blind Slats: A Step-by-Step Guide
Fixing broken window blinds sounds like a hassle, right? Most people think you need a toolkit the size of your garage and hours of patience just to swap out a few slats. But the truth is, with the right prep and the basics on hand, you can change blind slats with ease—even if you have never touched a screwdriver before. In fact, precision tools and some simple safety steps are all you need to get a professional result that makes your blinds look brand new.
Table of Contents
- Step 1: Gather Your Tools And Materials
- Step 2: Remove The Old Blinds Carefully
- Step 3: Measure And Cut New Slats As Needed
- Step 4: Install The New Slats Into The Blind Frame
- Step 5: Test The Functionality Of Your Blinds
- Step 6: Clean And Adjust For Optimal Appearance
Quick Summary
| Key Point | Explanation |
|---|---|
| 1. Gather necessary tools and materials | Assemble precision tools like pliers, screwdrivers, and replacement slats for an efficient repair process. |
| 2. Carefully remove old blinds | Fully extend blinds and systematically remove screws while supporting them to prevent damage. |
| 3. Measure and cut new slats accurately | Use existing slats as templates to ensure new slats match perfectly, maintaining consistent width and length. |
| 4. Install new slats methodically | Insert slats between ladder strings in the blind frame carefully to ensure proper alignment and function. |
| 5. Test functionality after installation | Raise, lower, and tilt the blinds several times to confirm smooth operation and proper alignment of slats. |
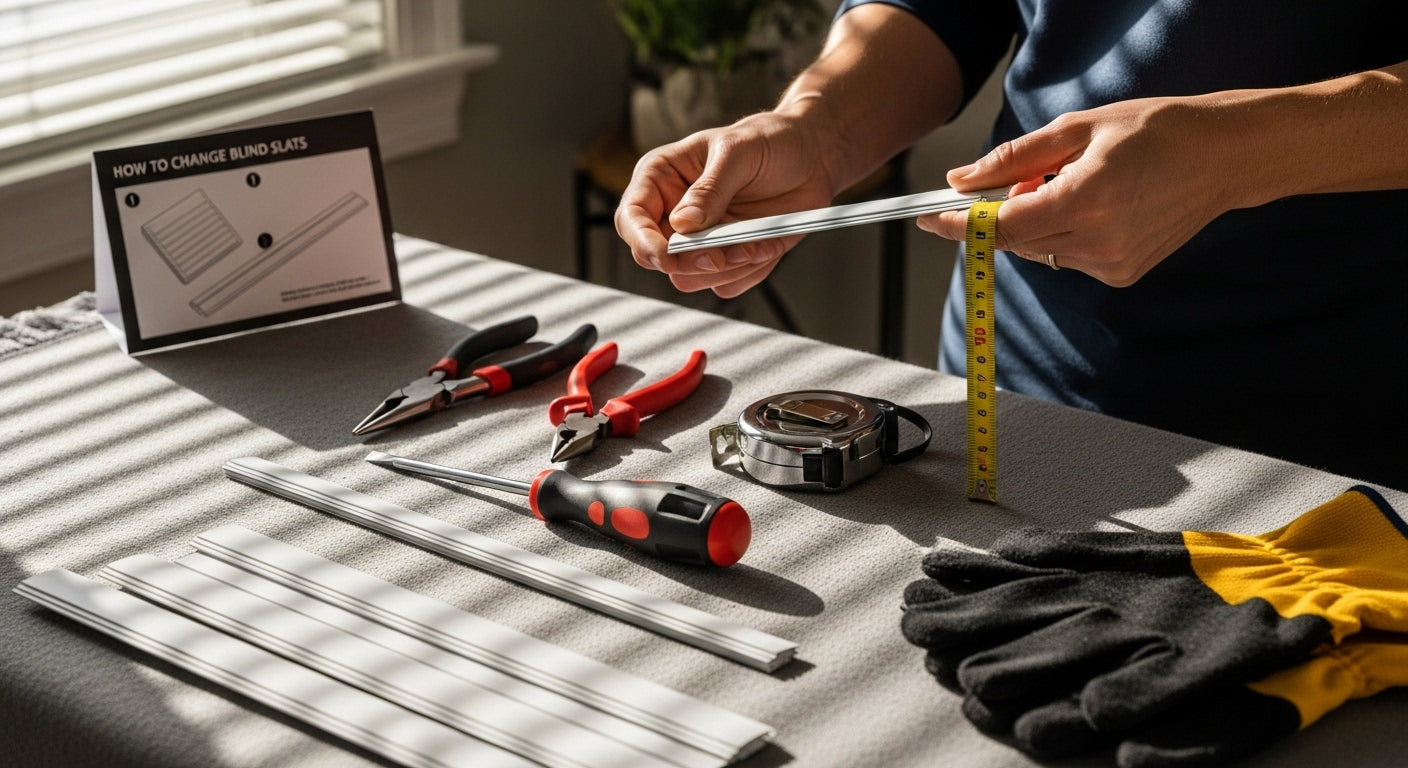
Step 1: Gather Your Tools and Materials
Successfully changing blind slats requires preparation and the right equipment. Before diving into the replacement process, you’ll need to collect specific tools and materials that will make your repair smooth and efficient. Understanding what you need upfront can save significant time and prevent frustrating interruptions during the project.
For this task, you’ll want to assemble a comprehensive toolkit that includes precision tools and safety equipment. Your primary collection should consist of needle-nose pliers, a flathead screwdriver, replacement slats (matching the exact width and style of your existing blinds), work gloves, and a clean workspace. These fundamental items will help you navigate the blind slat replacement with confidence.
Careful measurement is critical before beginning. Ensure you have a metal tape measure to confirm the precise dimensions of your existing blind slats. This step is crucial because blind slats come in various widths, typically ranging from 1 inch to 2.5 inches. Our comprehensive guide on window measurements can help you verify the correct sizing for your specific window treatment.
Your workspace matters as much as your tools. Select a clean, flat surface with good lighting and enough room to spread out your materials. A large table or clean floor area works well.
To help you prepare for replacing blind slats, this table summarizes the essential tools and materials along with their specific uses and notes to keep in mind.
| Tool/Material | Purpose | Notes |
|---|---|---|
| Needle-nose pliers | Adjust and guide slats, handle cords | Useful for precise adjustments |
| Flathead screwdriver | Remove screws and mounting hardware | Choose correct size to avoid stripping screws |
| Replacement slats | Swap out damaged slats | Match exact width and style to original blinds |
| Work gloves | Protect hands from sharp edges | Especially helpful with metal slats |
| Metal tape measure | Measure slat width and length | Ensures accurate sizing of new slats |
| Cutting tool | Trim new slats to match originals | Type depends on slat material (saw, cutter, etc.) |
| Soft/microfiber cloth | Clean work area and slats | Helps prevent scratches during handling |
| Drop cloth | Protects work surface | Use during measuring and cutting steps |
| Screw container | Store hardware during project | Prevents loss of small mounting screws |
Additionally, consider wearing work gloves to protect your hands from potential sharp edges on metal components. Some blind mechanisms can have slightly rough surfaces that might cause minor cuts or scrapes. Safety should always be your first priority when undertaking home repair projects.
By methodically gathering these tools and preparing your workspace, you’ll set yourself up for a successful blind slat replacement. The next step involves carefully removing the existing damaged slats, which will require the precision and preparation you’ve just established.
Step 2: Remove the Old Blinds Carefully
Removing old blinds requires precision, patience, and a systematic approach to prevent damage to your window frame or the surrounding wall. This crucial step sets the foundation for a successful blind slat replacement and demands careful attention to detail. Before beginning, double-check that you have all the tools from your previously prepared toolkit readily available.
Start by fully extending the blinds to their maximum length, which provides the best access to mounting brackets and hardware. Carefully examine the mounting mechanism, typically located at the top of the window frame. Most blinds are secured using metal brackets with small screws that can be easily removed with a flathead screwdriver. Look closely for any additional retention clips or locking mechanisms that might be holding the blinds in place.
Learn more about different blind installation techniques with our comprehensive guide to understand the potential variations in mounting systems. Some older or custom window treatments might have unique attachment methods that require extra caution.
Proceed by supporting the blinds with one hand while systematically removing screws with the other. Work slowly and deliberately, keeping the blinds balanced to prevent sudden dropping or potential wall damage. If the blinds feel stuck, do not force them. Instead, gently wiggle the mounting brackets to loosen any accumulated paint or debris that might be creating resistance.
Once the screws are removed, carefully lower the blinds away from the window frame. If the blinds are heavy or unwieldy, consider asking a helper to support the opposite end. Place the removed blinds on your prepared workspace, taking care not to bend or damage the slats you might want to use as reference for your replacement project.
Verify that all mounting hardware has been successfully removed from the window frame. Check for any remaining screw holes or wall anchors that might need patching before installing new blinds. A clean, prepared surface ensures a smoother installation in the subsequent steps of your blind slat replacement process. By removing the old blinds methodically and carefully, you’ve completed a critical phase of your window treatment renovation.
Step 3: Measure and Cut New Slats as Needed
Measuring and cutting new blind slats is a precision task that demands careful attention to detail and patience. Your goal in this step is to create replacement slats that perfectly match the existing blinds, ensuring a seamless and professional-looking repair. Accuracy is paramount when approaching this critical phase of blind restoration.
Begin by laying out the old slats as a precise template for your new replacements. Using your metal tape measure, carefully record the exact length and width of the existing slats. Pay close attention to subtle variations that might exist across different sections of the blind. Some blinds have slight manufacturing differences, so measuring multiple slats can help you confirm the most accurate dimensions.
Check out our comprehensive guide on measuring windows for additional insights into precise measurement techniques. When measuring, add a small buffer of approximately 1/8 inch to ensure smooth installation, which allows for slight adjustments during the mounting process.
For cutting, select a robust work surface covered with a protective material like a cutting mat or thick cardboard. If you’re working with metal or aluminum slats, use a metal cutting saw or specialized blind slat cutter. For wooden or plastic slats, a fine-toothed handsaw or circular saw with a precise blade will provide the cleanest cut. Always wear safety glasses and work gloves to protect yourself from potential debris or sharp edges during the cutting process.
Mark your cutting lines clearly using a straight edge or carpenter’s square to ensure perfectly perpendicular cuts. Make a single, smooth cutting motion to prevent splintering or uneven edges. After cutting, use fine-grit sandpaper to smooth any rough edges, which will help prevent snagging or potential injury when handling the slats.
Verify your new slats by performing a test fit. Place the cut slats next to the original blinds, checking their length, width, and overall appearance. Look for any imperfections or areas that might require additional trimming. The goal is to create replacements that are virtually indistinguishable from the original slats, maintaining the aesthetic and functional integrity of your window treatment.
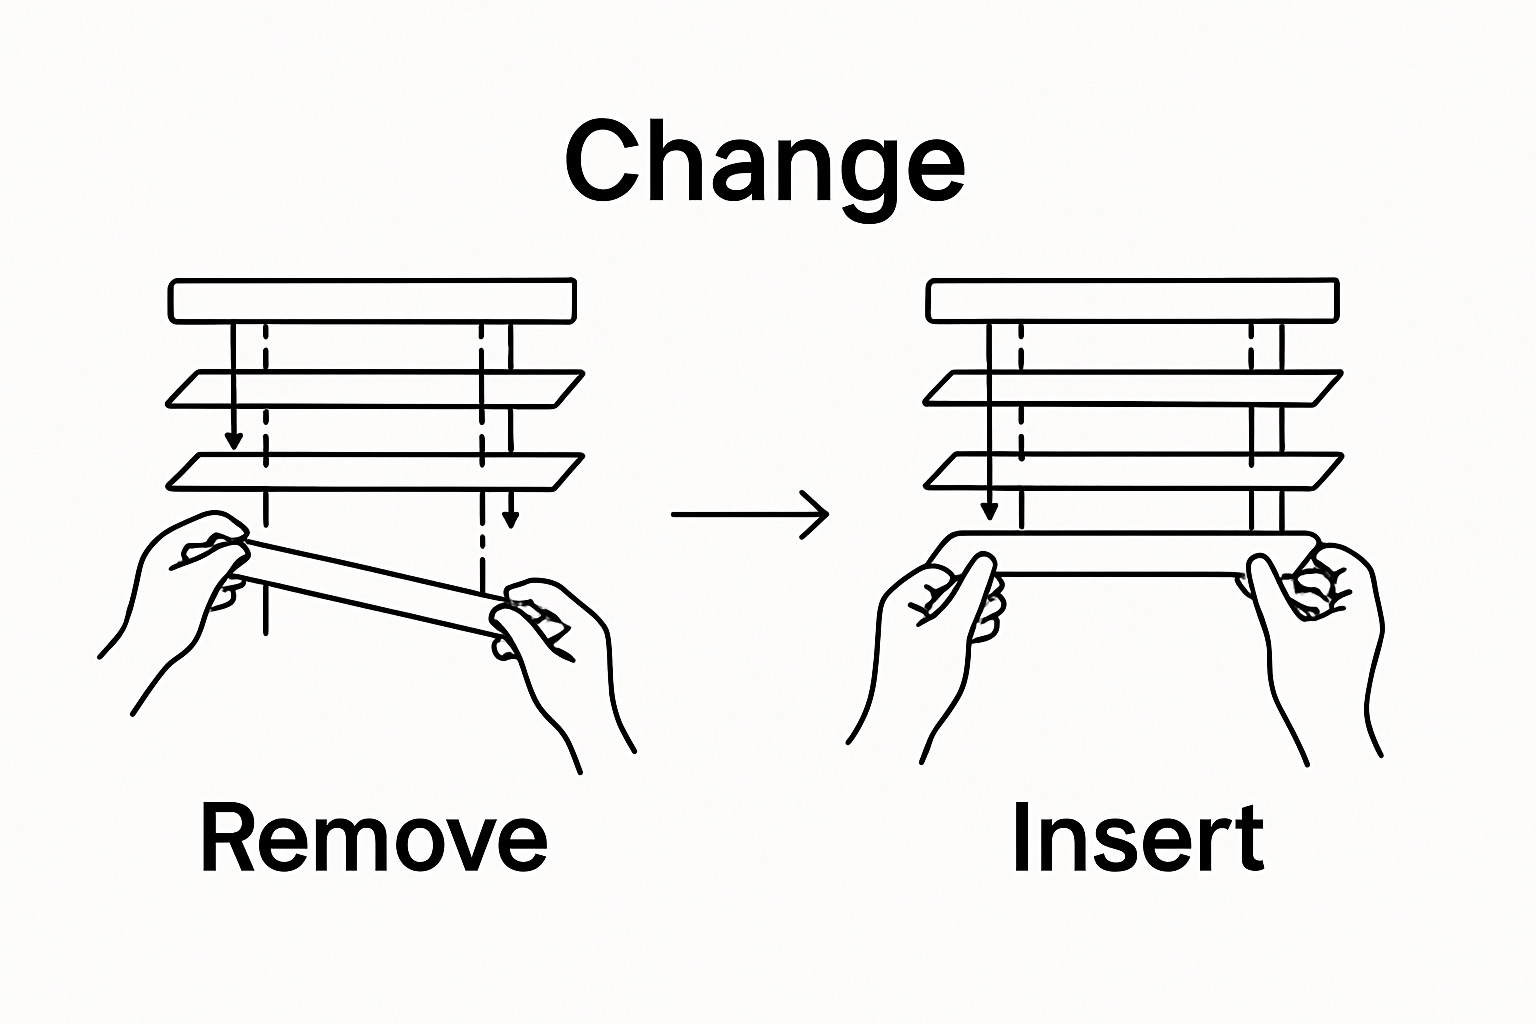
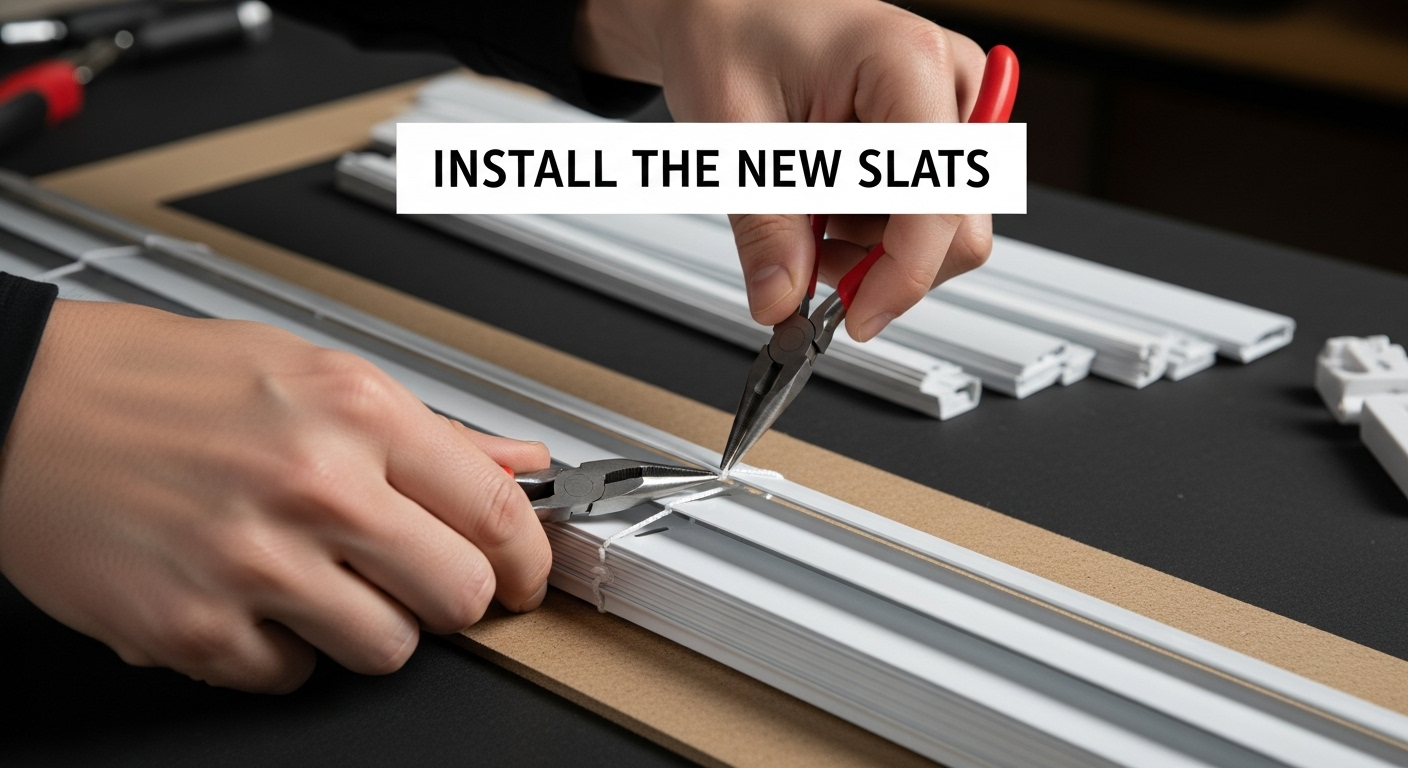
Step 4: Install the New Slats into the Blind Frame
Installing new slats is a delicate process that requires patience, precision, and a methodical approach. This critical step transforms your carefully measured and cut slats into a fully functional window treatment. Proper alignment is key to ensuring smooth operation and a professional appearance.
Begin by laying out the blind frame horizontally on your prepared workspace. Carefully examine the existing ladder strings or tapes that will support and connect your new slats. These thin cords or fabric strips are crucial for maintaining the structural integrity of your blinds. Gently spread these strings apart, creating enough space to slide in each new slat without causing unnecessary tension or strain.
Explore our comprehensive guide on window shade installation for additional insights into precise positioning techniques. Start inserting the slats from one end of the blind, working methodically across the entire length. Each slat should slide smoothly between the ladder strings, maintaining equal spacing and a consistent angle.
As you insert each slat, use needle-nose pliers to help guide and adjust their positioning if needed. Pay close attention to how the slats interact with the existing support strings. Ensure each slat sits perfectly horizontal and moves freely without catching or binding. If you encounter resistance, stop and reassess the alignment rather than forcing the slat into place.
Once all slats are inserted, perform a careful test of their movement. Gently tilt and adjust the slats to confirm they rotate smoothly and maintain a consistent position. Look for any signs of uneven spacing or misalignment. Small adjustments at this stage can prevent future operational issues and ensure the longevity of your repaired blinds.
Finally, verify the overall appearance and function of the blinds.
 Raise and lower them multiple times to confirm the new slats move correctly within the frame. Check that the slats remain evenly spaced and parallel when fully extended and when tilted at various angles. This final inspection ensures your blind slat replacement project has been completed successfully, restoring both the functionality and aesthetic appeal of your window treatment.
Step 5: Test the Functionality of Your Blinds
Testing the functionality of your newly repaired blinds is a critical final step that ensures all your careful work translates into smooth, reliable window coverage. Systematic testing will reveal any potential issues that might require additional adjustments before final installation. This phase is about confirming that your blind slat replacement has been successful and the window treatment operates precisely as intended.
Begin by hanging the blinds back in their original mounting brackets, taking care to secure them firmly. Gently raise and lower the blinds multiple times, observing the movement of each slat. Pay close attention to how smoothly the ladder strings guide the slats and whether they maintain a consistent horizontal alignment. Any jerking, catching, or uneven movement indicates that further fine-tuning might be necessary.
Explore our troubleshooting guide for window treatments to help diagnose any potential operational challenges. Next, test the tilting mechanism by rotating the tilt rod or cord. The slats should move in perfect unison, creating a clean, uniform angle without any individual slats sticking or misaligning. Precision is key in this testing phase.
Carry out a comprehensive range of motion test. Fully extend the blinds, then raise them to various heights. Watch how the slats stack and interact during these movements. Check that the bottom rail remains level and that no individual slats appear to be catching or preventing smooth operation. Listen for any unusual sounds that might indicate friction or misalignment.
For quick troubleshooting, use this table to identify potential installation issues and recommended solutions based on common problems detailed in the article.
| Problem | Possible Cause | Solution |
|---|---|---|
| New slats do not fit correctly | Inaccurate measurement or cutting | Re-measure, trim slats, ensure ladder strings are aligned |
| Slats catch or bind during movement | Improper alignment in ladder strings | Adjust slats for proper horizontal placement |
| Blinds feel stuck or do not raise/lower well | Mounting brackets not properly secured | Double-check screw placement and re-secure brackets |
| Individual slats stick or misalign on tilting | Uneven slat installation or defective tilt mechanism | Remove and reinstall misaligned slats; check tilt rod |
| Unusual sounds during operation | Friction from debris or rough edges | Clean slats; sand rough edges as needed |
| Slats appear uneven or angled | Misaligned ladder strings | Adjust ladder strings, realign slats |
Verify the blinds from multiple angles and distances. Stand back and examine the overall appearance, ensuring the new slats blend seamlessly with the existing frame. Look for any visual inconsistencies or areas where the replacement might be noticeable. Adjust as needed to maintain a uniform, professional appearance.
Finally, perform a durability test by operating the blinds several times in quick succession. This simulates regular daily use and helps identify any potential long-term issues with your repair. If the blinds pass all these tests, congratulations. You have successfully completed a professional blind slat replacement, restoring both the functionality and aesthetic appeal of your window treatment.
Step 6: Clean and Adjust for Optimal Appearance
The final stage of blind slat replacement focuses on refinement and presentation, transforming your functional repair into a polished window treatment. Meticulous cleaning and subtle adjustments will elevate the overall aesthetic and ensure your blinds look professionally restored. This step is about creating a seamless, high-quality finish that blends perfectly with your interior design.
Begin by preparing a gentle cleaning solution using warm water and a mild dish soap. Avoid harsh chemicals that might damage the slat material. Using a soft microfiber cloth, carefully wipe down each new slat, removing any dust or residue accumulated during the installation process. Pay special attention to the edges and corners, where debris tends to collect. For wooden or delicate slats, use a slightly damp cloth to prevent water damage, then immediately follow with a dry cloth to prevent moisture buildup.
Discover creative window treatment styling tips to enhance the overall look of your newly restored blinds. After cleaning, inspect each slat for alignment and consistency. Use needle-nose pliers to make minute adjustments, ensuring all slats sit perfectly parallel and maintain an identical angle when tilted. Precision is crucial in creating a professional appearance.
Check the mounting brackets and hardware for any loose screws or potential misalignments. Tighten any hardware using your screwdriver, but be careful not to over-tighten, which could strip the threads or damage the blind frame. Examine the blind from multiple angles and distances, looking for any visual inconsistencies that might detract from its overall appearance.
Consider the lighting in the room and how it interacts with your newly restored blinds. Position the slats at different angles to see how they filter light and create visual interest. Some slat materials catch light differently, so take time to understand how your specific blinds will enhance the room’s ambiance.
Finally, step back and appreciate your work. A successful blind slat replacement should look seamless, function smoothly, and enhance the aesthetic of your space. The careful attention you’ve invested in cleaning and adjusting will ensure your window treatment looks as good as new, providing both practical functionality and visual appeal for years to come.
Ready for an Effortless Blind Upgrade?
After following each step to change your blind slats, you probably realize how much precision, patience, and the right materials can impact your results. When you are measuring, cutting, and installing, even small mistakes can become big frustrations. Achieving that seamless, tailored finish takes not only careful preparation but also the right product quality—and that can feel overwhelming when you want your window treatments to look and function their best.
Have you ever wished you could skip the hassle and guarantee a flawless finish every time? Our Best Sellers collection features the most popular and trusted solutions for all your window covering needs, so you never have to second-guess your choice.

Stop struggling with mismatched slats and time-consuming repairs. Visit Value Blinds Direct to get custom-fit blinds made for your unique space. Want to see the newest styles or materials designed for easy installation and long-lasting durability? Explore our New Arrivals category. Make the switch now and enjoy quality, style, and reliability—without the stress. Shop today and transform your home with custom window treatments that align with your vision.
Frequently Asked Questions
How do I know what size blind slats to buy?
Measure the width and length of your existing slats using a metal tape measure. Ensure to check multiple slats for consistency, and consider adding a small buffer of 1/8 inch for smoother installation.
What tools do I need to change blind slats?
You will need needle-nose pliers, a flathead screwdriver, replacement slats, work gloves, and a clean, flat workspace. A cutting tool may also be necessary if you need to trim the new slats.
How can I ensure the new slats install correctly?
When installing the new slats, carefully insert them between the ladder strings, ensuring they are evenly spaced and aligned horizontally. Test for smooth movement before securing everything.
What should I do if the new slats don’t fit properly?
If the new slats do not fit properly, double-check your measurements and realign the ladder strings if needed. You may need to trim the slats for a better fit or adjust the installation method based on the mounting system.
Recommended
- How to Install Window Shades: A Step-by-Step Guide
- Measuring Windows for Blinds: The Simple Step-by-Step Guide
- Installing Cordless Blinds: A Step-by-Step Guide
- 7 Best Blinds for Bedrooms: Enhance Sleep & Style


