
How to Fix Crooked Blinds: Simple Steps for Straight Results
Did you know that over 65 percent of homeowners struggle with crooked or misaligned blinds at some point? Uneven blinds do more than just bother your eyes—they block natural light and affect the look of your entire space. Tackling this problem with the right tools and a smart approach not only improves your room’s appearance but also keeps your window treatments working smoothly for years to come.
Quick Summary
| Key Point | Explanation |
|---|---|
| 1. Gather essential tools first | Prepare a Phillips screwdriver, soft cloth, measuring tape, and step ladder to facilitate repairs effectively. |
| 2. Assess alignment carefully | Examine blinds in natural light to identify misalignment, focusing on mounting brackets, cords, and slats. |
| 3. Adjust mounting brackets methodically | Loosen screws slightly, realign brackets as needed, and ensure even height on both sides for proper functioning. |
| 4. Realign individual slats and cords | Extend blinds fully to check slat alignment; straighten twisted slats and untangle cords for a uniform look. |
| 5. Secure components and maintain regularly | Tighten screws without overtightening and implement a routine alignment check every few months to prevent issues. |
Table of Contents
- Step 1: Gather Essential Tools And Assess Blind Alignment
- Step 2: Adjust Mounting Brackets And Headrail Position
- Step 3: Realign And Straighten Blind Slats Or Cords
- Step 4: Test Blind Operation And Confirm Alignment
- Step 5: Secure And Finish To Ensure Lasting Results
Step 1: Gather Essential Tools and Assess Blind Alignment
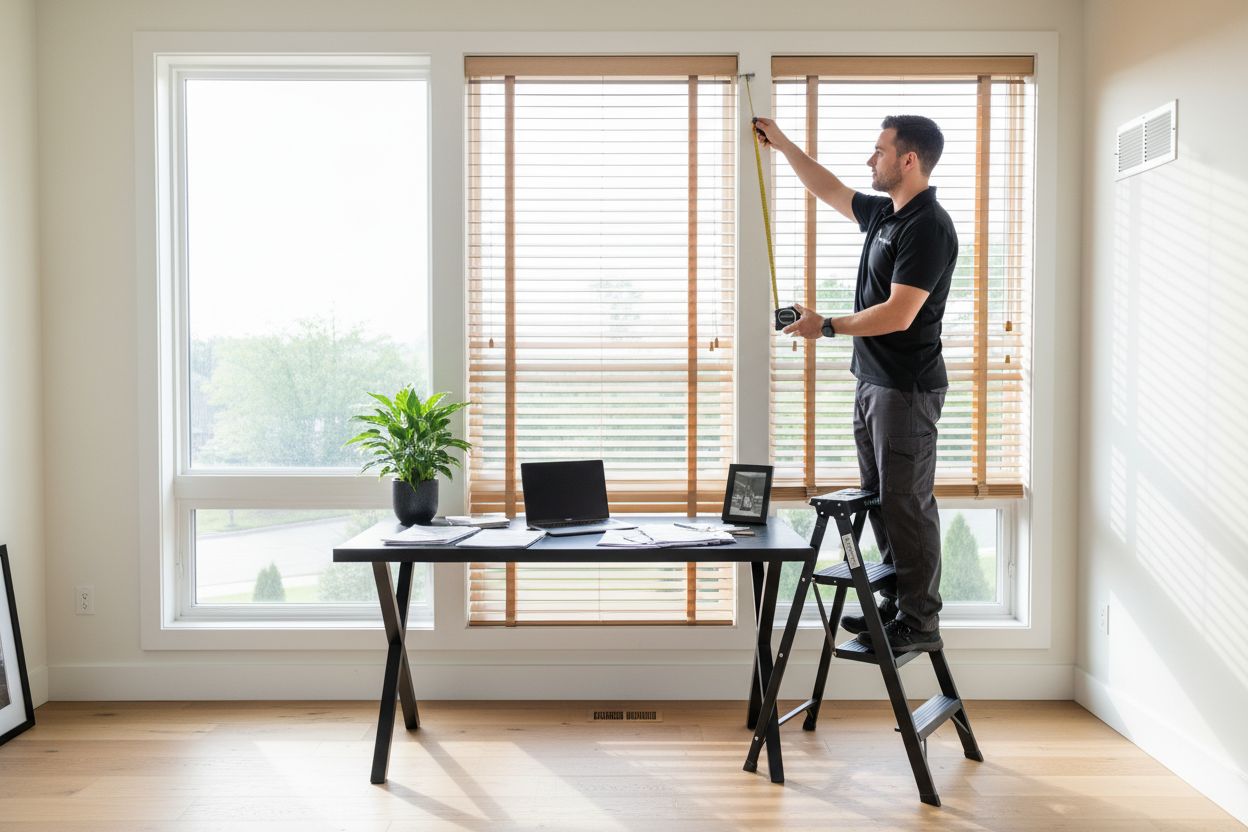
Fixing crooked blinds starts with strategic preparation. Before diving into repairs, you will need a few basic tools that transform an annoying home maintenance task into a smooth process. Grab a Phillips head screwdriver, a soft cloth, measuring tape, and a step ladder if your blinds are mounted high.
First, take a careful look at your blinds. Notice where they seem misaligned or uneven. Are they tilting to one side? Hanging lower on one end? Understanding the specific alignment issue helps determine your repair approach. Some blinds might just need minor adjustments while others require more comprehensive realignment.
Pro Tip: Natural light works best when assessing blind alignment. Open your curtains and examine the blinds against a bright background to spot subtle irregularities.
Your inspection should focus on three key areas: mounting brackets, cord mechanism, and slat positioning. Check whether the mounting brackets are securely fastened to the wall. Loose brackets can cause significant misalignment and make your blinds look perpetually crooked. Gently wiggle each bracket to test its stability.
If you want more guidance on precise window measurements and mounting techniques, read our comprehensive window treatment guide that can help prevent future alignment issues.
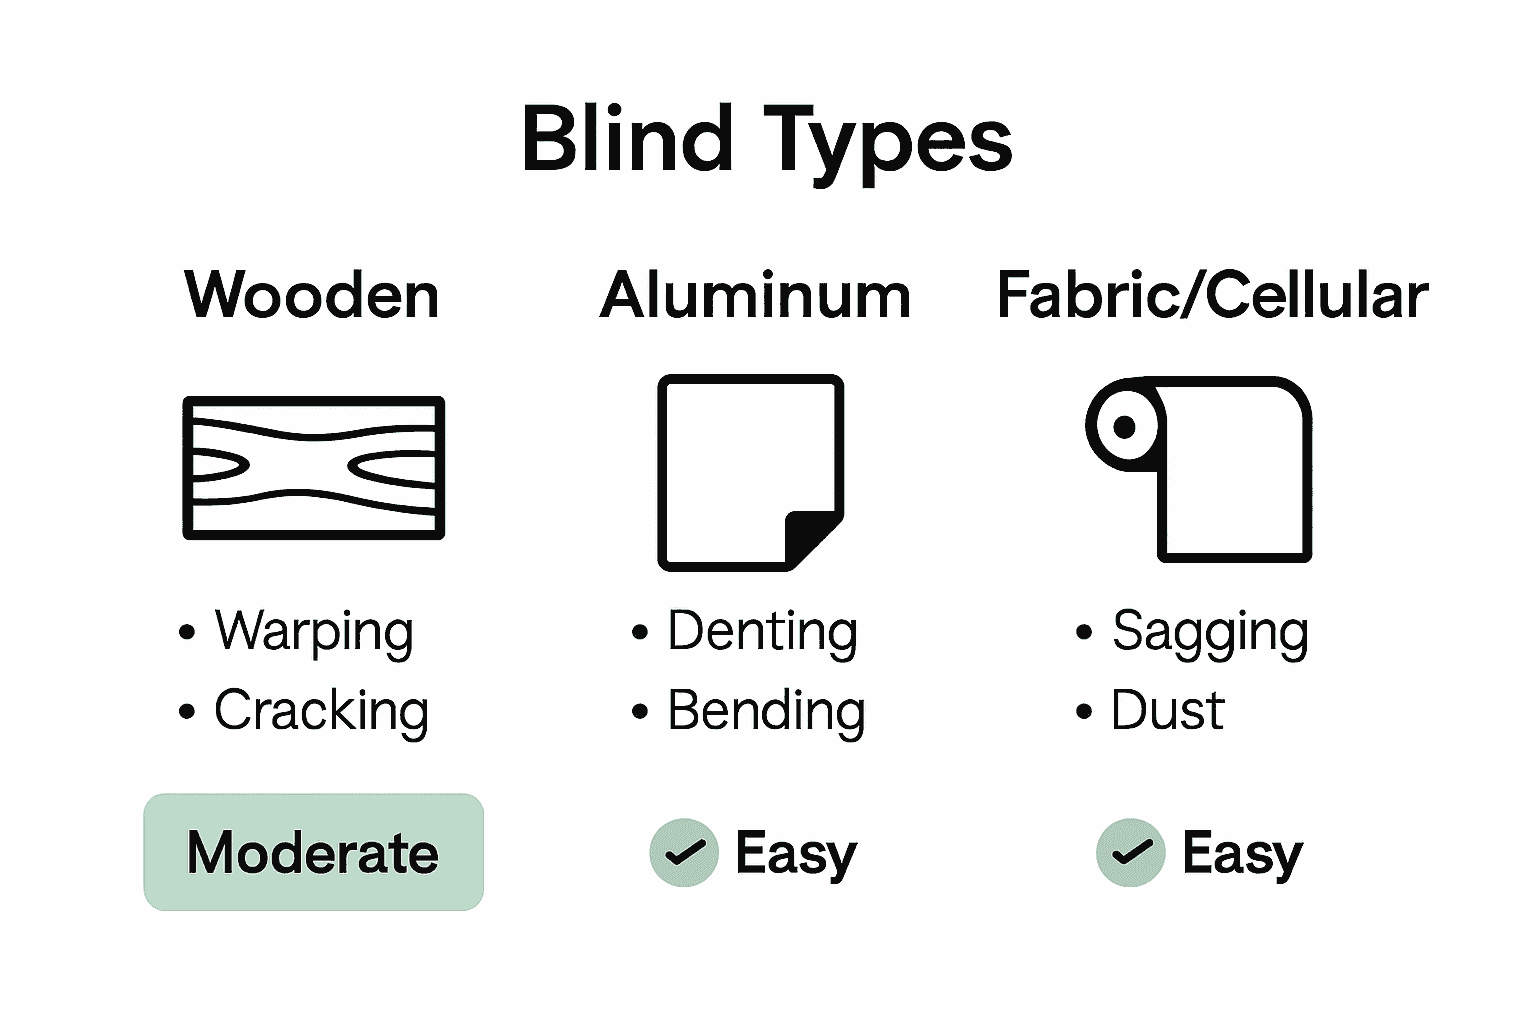
Remember that different blind types might require slightly different assessment techniques. Wooden blinds behave differently from fabric or aluminum options. Take your time during this initial evaluation to understand your specific blind’s structure and potential problem areas.
Here’s a quick comparison of how different blind types respond to alignment and adjustment:
| Blind Type | Typical Issues | Adjustment Difficulty | Special Considerations |
|---|---|---|---|
| Wooden | Warping Cracking |
Moderate | Handle with care; avoid excessive force |
| Aluminum | Bending Kinking |
Easy | More rigid; resists minor shifts |
| Fabric/Cellular | Sagging Twisting |
Easy | Gentle tensioning prevents damage |
With your tools ready and initial assessment complete, you are now prepared to tackle those misaligned blinds.
 The next step involves making precise adjustments to restore your window treatments to their original straight position.
Step 2: Adjust Mounting Brackets and Headrail Position
Now that you have assessed your blinds alignment, it is time to make precise adjustments to those mounting brackets and headrail. This crucial step will help restore your blinds to their perfect straight position and eliminate that frustrating tilt or uneven hang.
Start by carefully loosening the mounting bracket screws using your Phillips head screwdriver. Do not remove them completely just yet. Gently wiggle the bracket to determine its current positioning and how much adjustment you might need. Most blinds have small slots or holes in the brackets that allow for subtle realignment.
Pro Tip: Work slowly and make incremental adjustments. Tiny movements can make a significant difference in overall blind alignment.
If one side of your blinds appears lower than the other, you will want to raise or lower the corresponding mounting bracket. Carefully shift the bracket up or down within its mounting slot. Use your measuring tape to ensure both brackets are at exactly the same height. This precision prevents future alignment issues and keeps your blinds looking professionally installed.
The headrail the horizontal top section of your blinds needs special attention. Check if it sits perfectly level by using your measuring tape or a small level. Uneven headrail positioning can cause persistent crooked appearance even after bracket adjustments. Slightly loosen the headrail mounting points and nudge it into a perfectly straight position.
Learn more about proper window treatment installation techniques to ensure long lasting and beautiful window coverings.
Once you have made your adjustments, carefully tighten the mounting bracket screws. Do not overtighten as this can create new alignment problems. A firm but gentle approach works best. Give your blinds a gentle test by raising and lowering them to confirm the alignment looks correct.
With mounting brackets and headrail now properly positioned, you are ready to move on to fine tuning the individual slats and cord mechanism for a completely straight window treatment.
Step 3: Realign and Straighten Blind Slats or Cords
After adjusting your mounting brackets and headrail, the next crucial step is realigning the individual slats and cords. Misaligned slats can make even perfectly mounted blinds look uneven and unprofessional. Your goal is to create a uniform appearance that looks crisp and intentional.
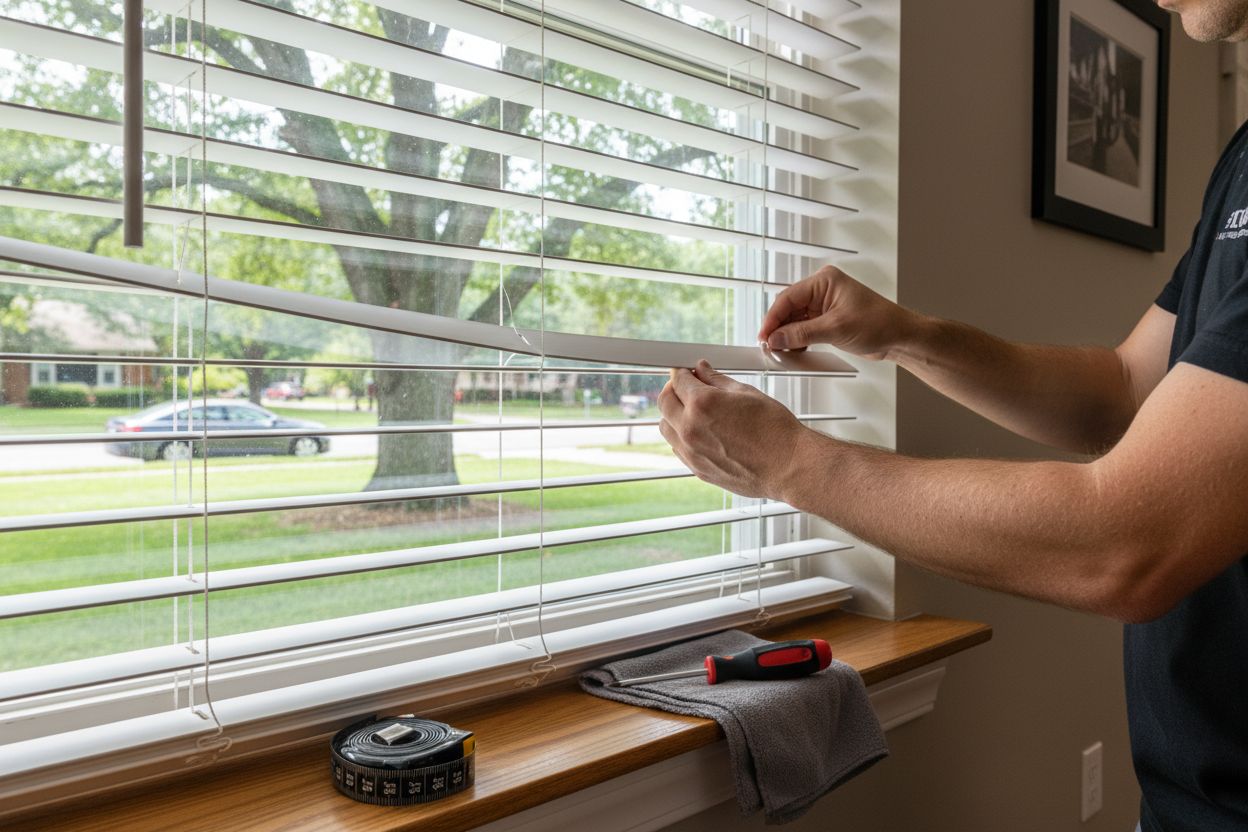
Start by fully extending your blinds. This gives you a complete view of how the slats are currently positioned. If some slats appear twisted or uneven, you will need to manually adjust them. Gently use your hands to straighten each slat individually. Work from the top down, ensuring each slat is parallel to the ones above and below it.
Pro Tip: Always handle slats with clean hands and use a soft touch to prevent bending or damaging the material.
Pay special attention to the control cords running through the slats. These cords can become twisted or tangled over time, causing misalignment. Carefully untangle any knots or loops. For wooden or aluminum blinds, you might need to gently pull the cords to create an even tension across all slats.
Check out our guide on changing blind slats if you encounter significant damage during this process. Sometimes replacement is easier than extensive repairs.
If your blinds have a cord lock mechanism, test it carefully. An improperly functioning cord lock can contribute to misalignment. Raise and lower the blinds several times to ensure smooth movement and consistent positioning. Listen for any unusual sounds that might indicate underlying mechanical issues.
Wooden blinds typically require more delicate handling compared to aluminum or synthetic options. Take extra care when adjusting their slats to prevent cracking or warping. For fabric or cellular blinds, gentle manipulation and even tension are key to maintaining their shape.
With your slats now straightened and cords realigned, you are approaching the final stages of restoring your blinds to their original perfect condition. The next step will involve making final adjustments and testing the overall functionality of your window treatments.
Step 4: Test Blind Operation and Confirm Alignment
You are now at the final stage of restoring your crooked blinds to perfect alignment. Testing involves a comprehensive evaluation of your repair work to ensure everything functions smoothly and looks exactly as it should. Think of this as your quality control moment where precision meets performance.
Begin by slowly raising and lowering your blinds multiple times. Pay close attention to how they move. Smooth vertical movement without catching or jerking indicates successful realignment. Watch the slats carefully as they ascend and descend. They should move in a uniform parallel motion with no visible twisting or uneven gaps.
Pro Tip: Natural daylight provides the best background for checking alignment. Open your curtains and observe how the blinds look against the window frame and incoming light.
Test the cord mechanism thoroughly. Pull the cords gently from different angles to confirm they maintain consistent tension. Your blinds should respond predictably with no sudden shifts or unexpected tilting. If you notice any resistance or unusual movement, you might need to revisit your previous adjustment steps.
Explore our comprehensive guide on repairing window treatments if you encounter persistent operational challenges during this testing phase.
Carefully examine the blind from multiple angles and distances. Stand back and look at the entire window to assess overall appearance. The goal is a symmetrical look where no individual component stands out as misaligned. Check both when the blinds are fully raised and completely lowered.
Remember that different blind materials behave differently. Wooden blinds might have slight variations that are normal. Aluminum and synthetic blinds typically demonstrate more rigid alignment. Your adjustment technique should respect the unique characteristics of your specific blind material.
If after multiple tests you are not satisfied with the results do not hesitate to repeat the entire realignment process. Patience and attention to detail are key to achieving professional looking window treatments.
Step 5: Secure and Finish to Ensure Lasting Results
With your blind alignment nearly complete, the final steps involve securing all components and creating a maintenance strategy that prevents future misalignment. These finishing touches transform your repair from a temporary fix to a long term solution that keeps your window treatments looking pristine.
Carefully tighten all mounting bracket screws using your Phillips head screwdriver. Apply consistent pressure without over tightening. Each screw should be snug but not forced. This prevents potential future shifting while maintaining the delicate balance you have carefully established during the realignment process.
Pro Tip: Use a small amount of thread locking compound on screws to prevent gradual loosening from regular blind operation.
Clean your blinds thoroughly after repairs. Use a soft microfiber cloth to remove any dust or debris accumulated during the realignment process. Gentle cleaning helps maintain the smooth movement of slats and prevents future alignment issues caused by buildup or residue.
Learn more about maintaining your window treatments to extend the life of your newly repaired blinds.
Consider implementing a regular maintenance routine. Every few months, perform a quick alignment check. Gently adjust slats and test cord tension to catch potential issues before they become significant problems. This proactive approach can dramatically extend the life of your window treatments and keep them looking professionally installed.
Take a moment to appreciate your handiwork. The difference between crooked and perfectly aligned blinds might seem subtle, but it can transform the entire look of your room. Your patience and attention to detail have restored your window treatments to their original beautiful condition.
If you encounter persistent alignment issues or significant damage during this process, do not hesitate to consult a professional. Some blind styles or extensive damage might require expert intervention. Your DIY skills are impressive but knowing when to seek professional help is equally important.
Ready for Perfectly Straight Blinds Every Time?
Struggling with crooked blinds can be incredibly frustrating. Even after careful adjustments, blinds that stay uneven or keep slipping out of alignment can make your home feel incomplete. You want straight results that last, but old or damaged hardware often gets in the way. At Value Blinds, we understand the importance of simple solutions and expert support when it comes to flawless window treatments. Discover the latest designs and smart features in our New Arrivals for hassle-free installation and lasting performance.

Do not let crooked blinds keep bothering you. Shop now at Value Blinds for customizable, easy-to-install blinds and shades that help eliminate alignment issues for good. See why so many homeowners choose our Best Sellers for reliability and modern style. Take the next step today and upgrade your window treatments with confidence.
Frequently Asked Questions
How do I identify the alignment issues with my blinds?
To identify alignment issues, carefully observe how your blinds hang. Check for tilting or unevenness, especially by looking against natural light to spot subtle irregularities.
What tools do I need to fix crooked blinds?
You will need a Phillips head screwdriver, a soft cloth, measuring tape, and possibly a step ladder if your blinds are mounted high. Gather these tools before starting your repair to streamline the process.
How can I adjust the mounting brackets to fix my blinds?
Loosen the screws on the mounting brackets slightly to allow for adjustment. Gently wiggle the bracket to reposition it and ensure both brackets are at the same height using a measuring tape.
What steps should I take to realign the individual slats of my blinds?
Fully extend your blinds and manually straighten each slat from top to bottom. Ensure that each slat is parallel to the others for a uniform appearance, taking care not to bend or damage them during adjustment.
How can I test if my blinds are aligned properly after adjustments?
Raise and lower your blinds several times to check for smooth operation and uniform slat alignment. Observe them from various angles to ensure they appear straight and consistent against the window frame.
What maintenance can I do to prevent crooked blinds in the future?
Implement a regular maintenance routine by checking alignment every few months. Gently adjust slats and test the cord mechanism to catch any potential issues early, ensuring your blinds stay looking their best.


