
Article: How to Measure Bay Window for Blinds: DIY Guide
How to Measure Bay Window for Blinds: DIY Guide
TL;DR:
- Measuring bay windows requires taking individual width and drop measurements for each panel to ensure a proper fit.
- Using templates and measuring multiple times helps prevent errors caused by angles, settling, or hardware bulkiness.
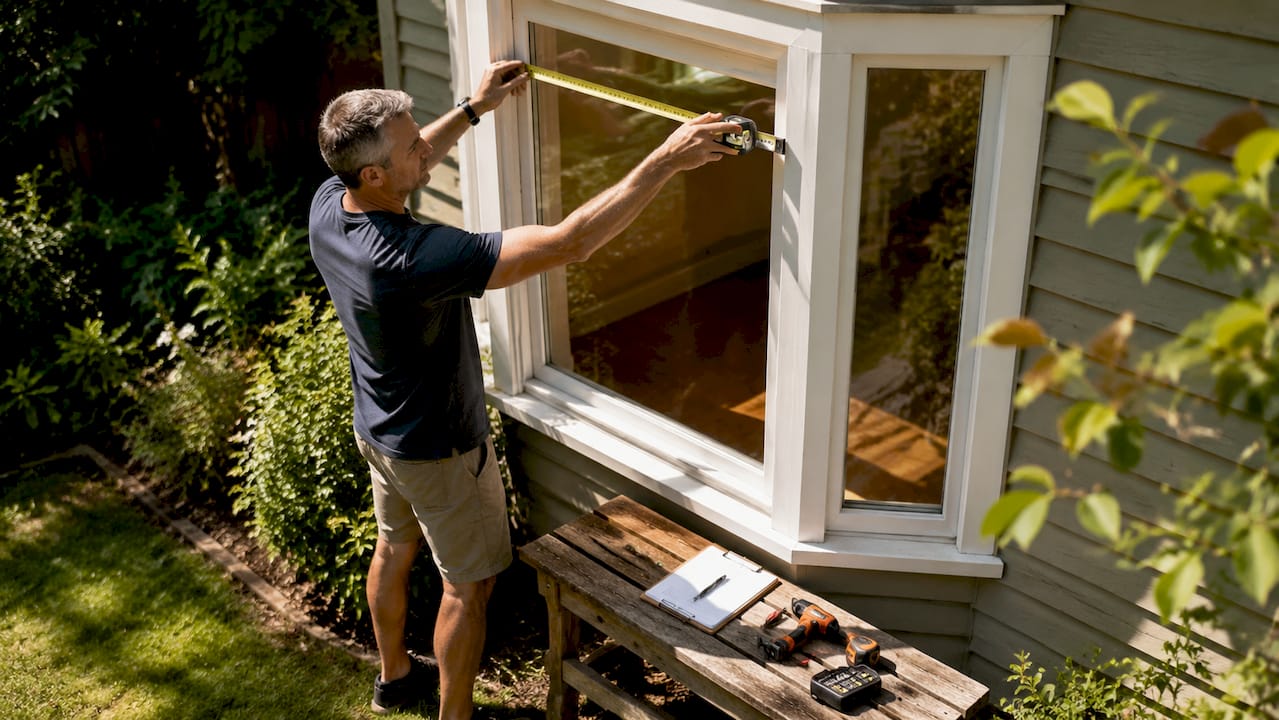
Measuring a bay window for blinds means capturing the exact width, drop, and depth of each individual panel before ordering any window treatment. Unlike a flat wall window, a bay window has multiple angled sections that each require separate measurements. Getting this right the first time saves you from costly reorders and frustrating installation days. This guide walks you through every step, from choosing your blind style to recording your final numbers, using the same techniques professional installers rely on.
What tools and preparations are needed before you start
The right tools make the difference between a measurement that works and one that wastes money. Gather these before you touch the window:
- Steel tape measure. Experts recommend steel measuring tapes specifically for durability and accuracy when measuring bay windows. Cloth tapes flex and give false readings.
- Notebook and pencil. Write every number down immediately. Memory fails between the window and the computer.
- Cardboard or stiff paper. You will cut this into templates later to check corner joins.
- A helper (optional but useful). Holding a tape across a wide bay section alone is awkward.
Choose your blind style before you measure anything. Different blind styles require different mounting depths, typically 1.5 to 2.5 inches, and that depth determines whether your frame can physically hold the hardware. Cellular shades, wooden blinds, and roller shades all have different headrail profiles. Picking the style first tells you exactly how much recess depth you need to confirm.
Clear the window area before measuring. Remove curtains, check for window cranks, and note any handles that stick out from the frame. These obstacles affect both your depth measurement and your drop measurement.

Pro Tip: Label three sticky notes “Left,” “Center,” and “Right” and stick them to the corresponding window panes before you start. This prevents any confusion when you have six numbers written in your notebook.
How do you measure the width and angles of each bay window panel?
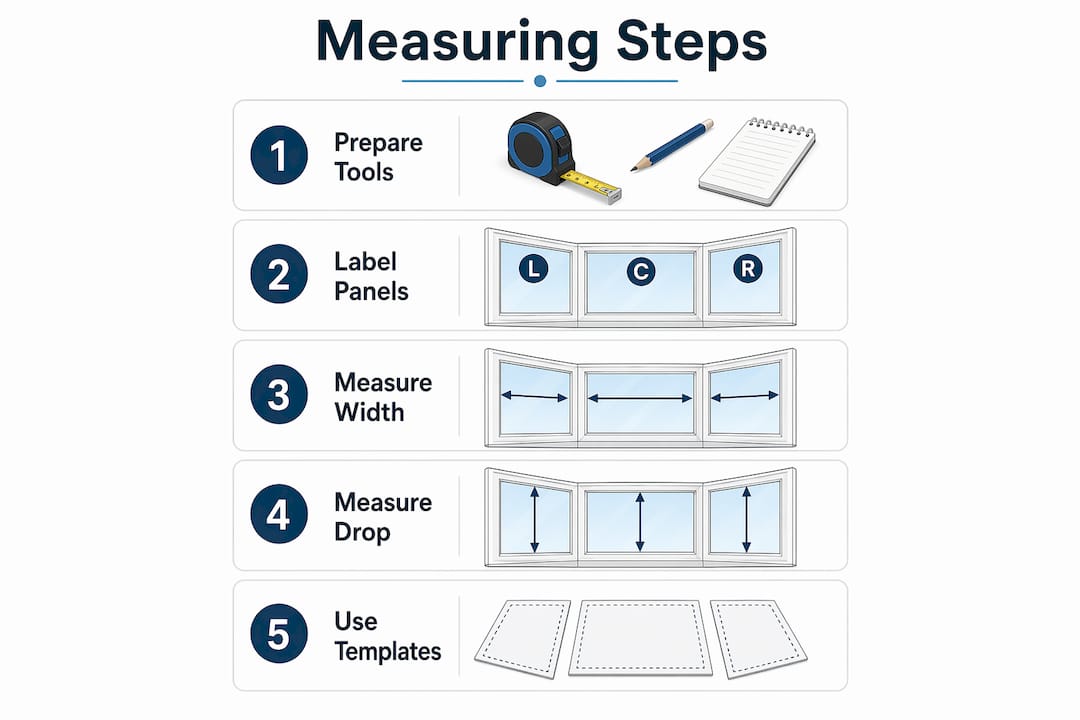
Bay windows are not one window. They are three or more separate panels joined at angles, and each panel needs its own width measurement. Treating them as one unit is the most common mistake DIYers make.
Follow these steps for each panel:
- Measure at three heights. Take the width at the top, middle, and bottom of each panel opening. Bay windows settle over time, and the opening is rarely perfectly square.
- Record the smallest number. For inside mounts, use the smallest width measurement to avoid blinds that drag against the frame or leave gaps on the other side.
- Measure to the nearest 1/8 inch. Rounding to the nearest half inch introduces enough error to cause fitting problems.
- Note the angle between panels. Bay windows typically meet at 90° or 135° angles. Record which angle applies to each join. This affects how the headrails sit next to each other at the corners.
- Label each measurement immediately. Write “Left panel: 24 3/8 inches” not just “24 3/8.” You will thank yourself later.
Pro Tip: Cut a piece of cardboard to the exact headrail depth of your chosen blind and hold it at each corner join. This shows you whether two headrails will overlap or leave a gap before you place the order.
The cardboard template technique is one of the most underused tools in DIY blind fitting. Templates help visualize how headrails meet at angles, giving you a physical preview of the final installation. A few minutes with cardboard can prevent a week of waiting for a replacement order.
| Panel | Width at top | Width at middle | Width at bottom | Use this measurement |
|---|---|---|---|---|
| Left | 24 1/2 in | 24 3/8 in | 24 1/4 in | 24 1/4 in |
| Center | 36 in | 35 7/8 in | 35 3/4 in | 35 3/4 in |
| Right | 24 3/8 in | 24 1/4 in | 24 1/4 in | 24 1/4 in |
Use a table like this for your own measurements. The “Use this measurement” column always shows the smallest figure from each row.
What is the best method to measure the drop and depth for bay window blinds?
Drop is the vertical distance from where the blind will mount down to where it will end. Depth is how far back into the frame the blind hardware needs to sit. Both numbers are critical, and both are easy to get wrong.
Measuring the drop:
- Decide your fixing point first. For inside mounts, measure from the top of the frame opening. For ceiling mounts, measure from the ceiling.
- Measure straight down to the window sill. Do not angle the tape.
- Take three drop measurements across the width of each panel: left side, center, and right side.
- Use the smallest drop measurement for inside mounts. Structural settling causes uneven floors and ceilings around bay windows, and the smallest figure prevents the blind from scraping the sill.
Measuring the depth:
- Measure from the front face of the frame to the glass at multiple points across each panel.
- Use the smallest recess depth to confirm the headrail will fit flush inside the frame.
- Check for window handles or cranks. Obstructions like handles can prevent blinds from sitting flush. Measure the clearance around them and compare it to your blind’s hardware depth.
- Confirm the recess is deep enough for your chosen blind style. If the depth is too shallow, you will need an outside mount instead.
Pro Tip: If your recess depth is borderline, contact the manufacturer before ordering. Most will confirm the minimum depth required for their specific headrail, saving you a return.
How to interpret measurements and avoid common ordering mistakes
Recording accurate numbers is only half the job. Understanding how manufacturers use those numbers is the other half.
Most manufacturers automatically deduct 5–12 mm from your stated measurements for bracket clearance. That deduction accounts for the space the mounting brackets take up inside the frame. If you also subtract an allowance manually before submitting your order, the blind arrives undersized. Always check the manufacturer’s instructions to confirm whether they deduct automatically or expect you to provide a pre-deducted number.
Before placing your order, verify: Did you record the smallest width and drop for each panel? Did you check whether the manufacturer deducts automatically? Did you confirm recess depth against the headrail spec? If all three answers are yes, your order is ready.
Common mistakes to avoid:
- Ignoring uneven floors. A floor that drops 1/4 inch across a wide bay panel will cause the blind to scrape on one side if you use the largest drop measurement.
- Mixing up panel labels. Labeling each panel clearly as Left, Center, and Right prevents measurements from getting swapped during ordering.
- Forgetting inside vs. outside mount differences. Inside mounts require the smallest measurement. Outside mounts require you to add overlap on each side, typically 1.5 to 2 inches beyond the frame edge, for full light coverage.
- Measuring only once. Measure every dimension at least twice. If the two readings differ, measure a third time and use the smallest.
For a deeper look at inside mount specifics, the inside mount blind guide at Valueblindsdirect covers the deduction rules in detail.
Pro Tip: Take a photo of each window panel with your measurements written on a sticky note in frame. You will have a visual record that matches your notebook numbers, which is useful if questions come up during ordering.
What additional techniques help guarantee a perfect bay window blind fit?
A few extra steps separate a good measurement job from a great one. These techniques are used by professional installers and are easy to replicate at home.
- Make cardboard templates for every corner. Cut the cardboard to the exact headrail depth of your chosen blind. Hold it at each corner join and check that two templates from adjacent panels do not overlap. If they do, you need a shallower headrail or a different blind style.
- Measure multiple times on different days. Wood frames expand and contract with humidity. Measuring twice, a few days apart, catches any variation.
- Confirm blind type compatibility. Selecting the blind style first is critical because frame depth must accommodate the hardware. Cellular shades tend to have shallower headrails than wooden blinds, making them a practical choice for shallow bay window recesses.
- Contact the supplier with your measurements before ordering. Most custom blind suppliers, including Valueblindsdirect, offer expert support to review your numbers. A five-minute call can prevent a two-week delay.
- Check manufacturer instructions for each product. Deduction rules, minimum recess depths, and bracket spacing all vary by product. Read the spec sheet for your chosen blind before finalizing numbers.
For a complete walkthrough on measuring custom window treatments, the custom blinds measuring guide at Valueblindsdirect covers additional window types alongside bay windows.
Pro Tip: If your bay window has an unusual angle, not the standard 90° or 135°, use a digital angle finder (available at any hardware store) to get the exact degree. Record it alongside your width measurements and share it with your supplier.
Key takeaways
Accurate bay window blind measurement requires taking the smallest width and drop for each panel separately, confirming recess depth, and letting the manufacturer handle bracket deductions.
| Point | Details |
|---|---|
| Measure each panel separately | Bay windows have multiple sections; mix them up and the blinds will not fit. |
| Always use the smallest measurement | The smallest width and drop prevents scraping, gaps, and fitting failures. |
| Let manufacturers deduct for brackets | Submitting pre-deducted numbers results in undersized blinds. |
| Use cardboard templates at corners | Templates reveal headrail overlap or gaps before you place the order. |
| Label every measurement clearly | Left, Center, Right labels prevent costly mix-ups during ordering. |
What I have learned from measuring bay windows the hard way
Bay windows look straightforward until you are standing in front of one with a tape measure. The angles catch people off guard every time. Most DIYers assume the three panels are the same width. They almost never are. Even in a new build, the center panel is often a different size than the flanking panels, and the angles between them vary by a degree or two from what the builder intended.
The cardboard template trick changed how I approach every bay window job. Before I started using templates, I relied on math alone to figure out whether two headrails would clear each other at the corner join. Math works in theory. In practice, a headrail that is 2 inches deep and a frame angle of 135° leaves less clearance than the calculation suggests, because the bracket hardware adds real-world bulk that drawings do not capture.
Structural settling is the other factor that trips people up. A bay window that was perfectly square when installed ten years ago may have shifted enough to make the smallest drop measurement 3/8 inch shorter than the largest. That gap matters. A blind cut to the largest drop will scrape the sill on one side and look uneven from inside the room.
My honest advice: measure twice, use the smallest number, and call the supplier before you order if anything looks unusual. Professionals are not always necessary, but a five-minute conversation with an expert saves more time than any shortcut.
— Sunny
Get the right fit with Valueblindsdirect

Valueblindsdirect carries a wide range of custom bay window blinds built to your exact measurements, including cellular shades, wooden blinds, roller shades, and motorized options. Once you have your panel measurements recorded, the Window Treatment Design Studio lets you visualize styles, get expert guidance, and place a custom order without guesswork. The team at Valueblindsdirect reviews your measurements before production, catching errors before they become expensive problems. If you are ready to order or just want a second set of eyes on your numbers, the design studio is the right next step.
FAQ
What tools do I need to measure a bay window for blinds?
A steel tape measure, a notebook, a pencil, and cardboard for templates are the core tools. A steel tape gives the accuracy needed for measurements down to the nearest 1/8 inch.
Should I measure each bay window panel separately?
Yes. Each panel must be measured individually for width and drop because panels are rarely the same size. Label each set of measurements as Left, Center, or Right to avoid mix-ups when ordering.
Do I need to subtract an allowance before ordering custom blinds?
Most manufacturers deduct 5–12 mm automatically for bracket clearance. Check the manufacturer’s instructions first. Subtracting your own allowance on top of theirs results in blinds that are too narrow.
What is the minimum recess depth needed for bay window blinds?
Recess depth requirements vary by blind style, but most blinds need at least 1.5 to 2.5 inches of depth for the headrail and brackets. Measure the shallowest point of your recess and compare it to the spec for your chosen product.
What is the difference between inside mount and outside mount for bay windows?
Inside mount blinds sit within the window frame and require the smallest width and drop measurements. Outside mount blinds attach to the wall or frame face and need added width on each side, typically 1.5 to 2 inches, for full light coverage.


