

Article: 3 Measurements to Get Home Depot Blinds Right for Homeowners
3 Measurements to Get Home Depot Blinds Right for Homeowners
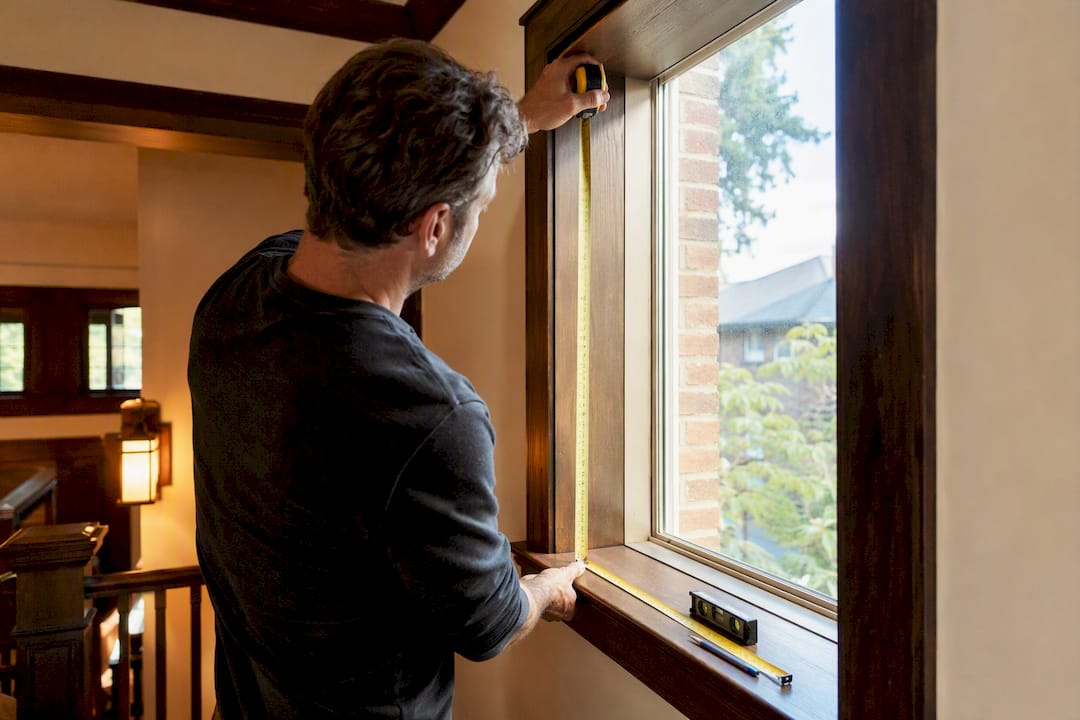
Pick your mount type first (inside or outside), then measure width, height, and depth, and write them down as W x H x D. Use a steel tape measure, never cloth, and measure to the nearest 1/8 inch. Take all three measurements at three separate points on the window. That single habit, more than any fancy tool, is what keeps your new blinds from arriving too big, too small, or just plain wrong. 📏
TL;DR:
- Measure window width at three points and use the narrowest, especially in warped frames, to ensure a proper inside mount fit.
- Add about 3 inches total for outside mounts, with at least 2 inches of clearance above, to maximize light coverage and ease of installation.
- For uneven frames, compare diagonal measurements; significant differences indicate a warped frame that favors outside mounting.
- Use a steel tape measure to the nearest 1/8 inch, and record measurements as W x H x D, labeling each for clarity.
- Double-check measurements on separate days and consult professional support if uncertain, to prevent costly errors and returns.
Table of Contents
- How to Measure for Blinds at Home Depot: Inside Mount
- How to Measure for an Outside-Mount Blind (Plus Allowances That Matter)
- Measuring Specialty Windows and Doors
- Tools, Checklist, and Common Measuring Mistakes
- How Valueblindsdirect Helps You Avoid Measuring Errors
- Measuring an Uneven or Warped Window Frame
- Making Sense of Home Depot’s Measurement Guidelines
- Measuring for Different Blind Materials and Styles
- A Simple Workflow for Your First Measuring Trip
- Verify Your Measurements With Valueblindsdirect’s Design Studio
- Sources
- FAQ
How to Measure for Blinds at Home Depot: Inside Mount
An inside mount tucks the blind right inside the window frame, which gives you that clean, built-in look everyone wants. But it only works if your measurements are dead on, because there’s zero room for guessing here.
Here’s the exact sequence Home Depot’s measurement guide recommends.
- Measure width at the top, middle, and bottom of the window opening. Write down all three numbers, then use the narrowest one. Window frames shift over time (yes, even in newer homes), so the tightest spot is your real clearance limit.
- Measure height at the left, middle, and right sides of the opening. This time, use the longest measurement, so your blind fully covers the window with no gap peeking through at the bottom.
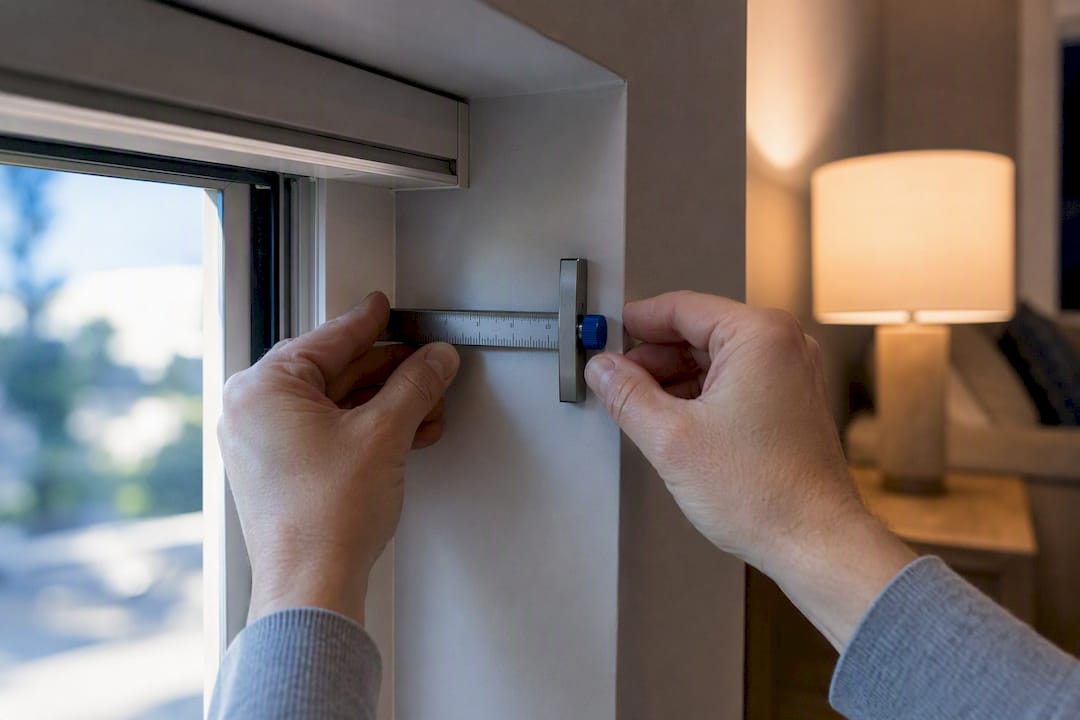
- Measure depth at three points inside the frame, checking how much room you have for the headrail and brackets. Most inside-mount blinds need a minimum depth, so check the specific product’s mounting requirements before you order.
- Record everything as W x H x D, and label which window it belongs to (ugh, nothing’s worse than four unlabeled slips of paper and no idea which one goes to the kitchen).
Round every measurement to the nearest 1/8 inch, and don’t round down “just to be safe.” Manufacturers typically apply their own small factory deductions for smooth operation, so give them your real number, not a padded one.
Pro Tip: Snap a quick photo of each window with your tape measure still extended before you put it away. It’s a five-second habit that saves you a return trip when you’re double-checking your order.
If you want a deeper walk-through with illustrations, Valueblindsdirect’s guide on measuring for inside mount blinds covers edge cases like shallow frames and stacked trim.
How to Measure for an Outside-Mount Blind (Plus Allowances That Matter)
Outside mount means the blind hangs on the wall or trim, covering the window frame entirely instead of tucking inside it. It’s the go-to fix when your window is too shallow for an inside mount, or when the frame is out of square and an inside fit just won’t sit right.
Here’s how to get it right:
- Measure the full width you want the blind to cover, including trim if you’re mounting past it.
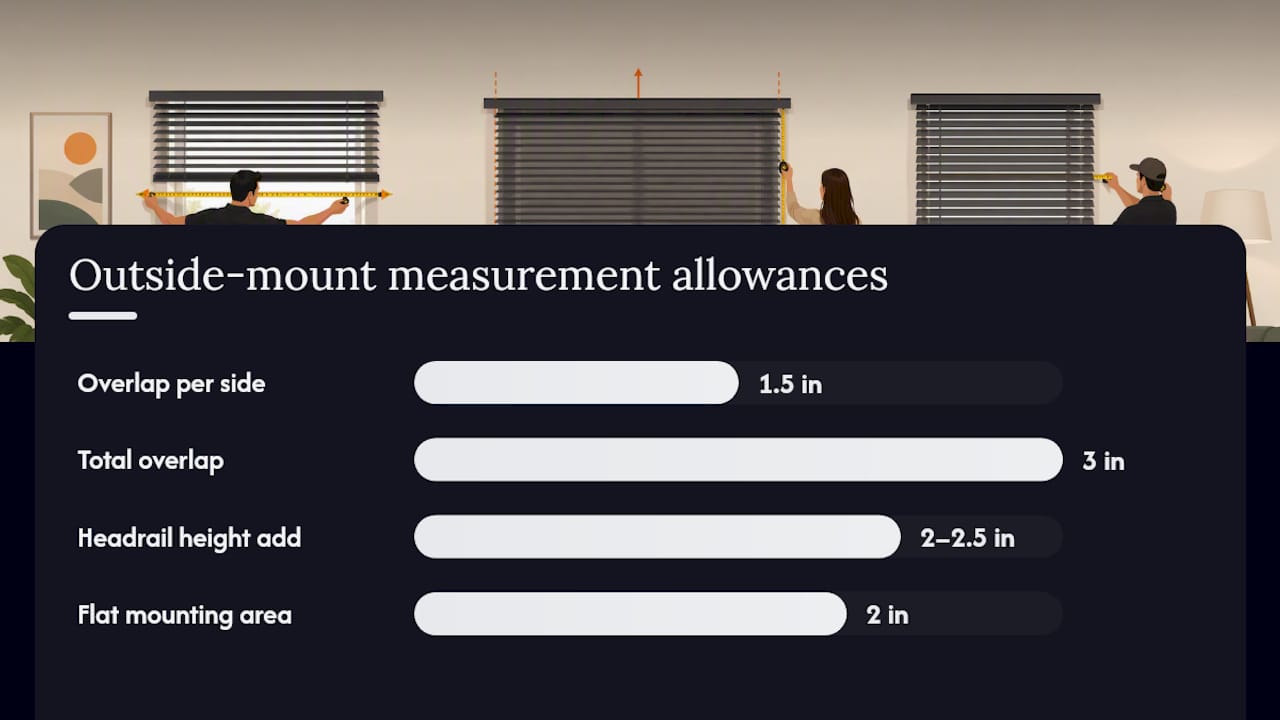
- Add roughly 3 inches total, about 1.5 inches per side, for better light control and privacy coverage, according to Home Depot’s measurement PDF. Some products call for a different overlap, so check the specific listing.
- Measure the height from where you plan to mount the headrail down to where you want the blind to end. If it’s hanging near the floor, leave clearance so it can operate without dragging.
- Account for headrail height, which typically adds another 2 to 2.5 inches above your measurement line. Try to leave at least 2 inches of flat wall or trim above the opening for solid bracket mounting.
The same Home Depot guide also recommends checking diagonal measurements corner to corner. If those two diagonals come out noticeably different, your frame isn’t square, and outside mount is usually the safer call.
Outside mount shines when depth is tight, the frame is uneven, or you want maximum light blocking and privacy edge to edge.
Measuring Specialty Windows and Doors
Sliding glass doors, French doors, and heavily trimmed windows don’t play by the same rules as a standard double-hung window. Here’s what changes for each:
- Vertical blinds and sliding panels: Add about 3 inches above the opening and 3 inches past each edge for full privacy coverage, and measure the exact height where the headrail will sit. Valueblindsdirect’s guide to measuring for vertical blinds breaks this down room by room.
- Patio doors: Measure from your planned headrail position all the way to the floor, then deduct about 1/2 inch for operating clearance so the blind doesn’t drag or catch when it opens.
- French doors: Measure the actual glass area, and build in extra allowance at the top and bottom to clear the door handle when it swings.
- Windows with heavy moulding: For outside mount, measure to the outer edge of the trim. For inside mount, measure to the inner edge of the frame, and consider extension brackets if the moulding juts out further than your bracket depth allows.
If you’re weighing door styles alongside your window treatments, this breakdown of interior door types is a useful companion read for planning clearances room by room.
Tools, Checklist, and Common Measuring Mistakes
You don’t need a toolbox full of gear, just the right handful of items used the right way.
What to grab before you start:
- A steel tape measure (cloth tape stretches and throws off your numbers)
- A pencil and paper, or a printed worksheet
- A sturdy ladder for taller windows
- A second person to help hold the tape steady and steady you on the ladder
- Your smartphone, for reference photos of each window
Your quick pre-order checklist:
- Choose inside or outside mount for each window
- Measure depth (inside mount only)
- Measure width and height at three points each
- Write everything down as W x H x D, labeled by room
- Photograph each window with the tape still in place
- Recheck every number before you submit your order
The most common mistakes are almost always avoidable. Using a fabric tape measure instead of a steel one, rounding to the nearest half inch instead of the nearest 1/8 inch, and mixing up which number is width and which is height are the top three that lead to returns. Skipping the depth check, ignoring obstructions like handles or locks, and never confirming a specific product’s mounting requirements round out the list.
Pro Tip: Measure every window twice on two different days if you can. Frames settle and shift with humidity, and catching a discrepancy before you order beats catching it after the blind arrives.
Valueblindsdirect’s general DIY measuring guide walks through this exact checklist with printable worksheets you can take window to window.
How Valueblindsdirect Helps You Avoid Measuring Errors
Getting three measurements right per window, times however many windows you’ve got, is a lot to hold in your head. That’s exactly why Valueblindsdirect built its measurement guides and Design Studio the way we did: to catch mistakes before they become an ill-fitting blind on your wall.
Free fabric swatches let you check color and texture before committing, and our support team is there when a number doesn’t feel right or a window doesn’t fit the “standard” mold. If you’d rather not measure solo, professional measuring and installation options are available, backed by our warranty and returns policy, so a small error doesn’t turn into a costly redo.
Measuring an Uneven or Warped Window Frame
Older homes especially: your window is probably not a perfect rectangle, and that’s fine, as long as you measure for it. Take your three width measurements (top, middle, bottom) and your three height measurements (left, middle, right) exactly as you would for any window, but pay close attention to how much those numbers actually vary.
If the spread between your narrowest and widest width is small, an inside mount will typically still work fine using the narrowest number. If the frame is visibly out of square or the numbers swing by a noticeable margin, Home Depot’s measurement guidance recommends checking diagonal corner-to-corner measurements. A big difference between the two diagonals confirms the frame is warped, and outside mount becomes the more forgiving choice since it covers the frame rather than fitting precisely inside it.
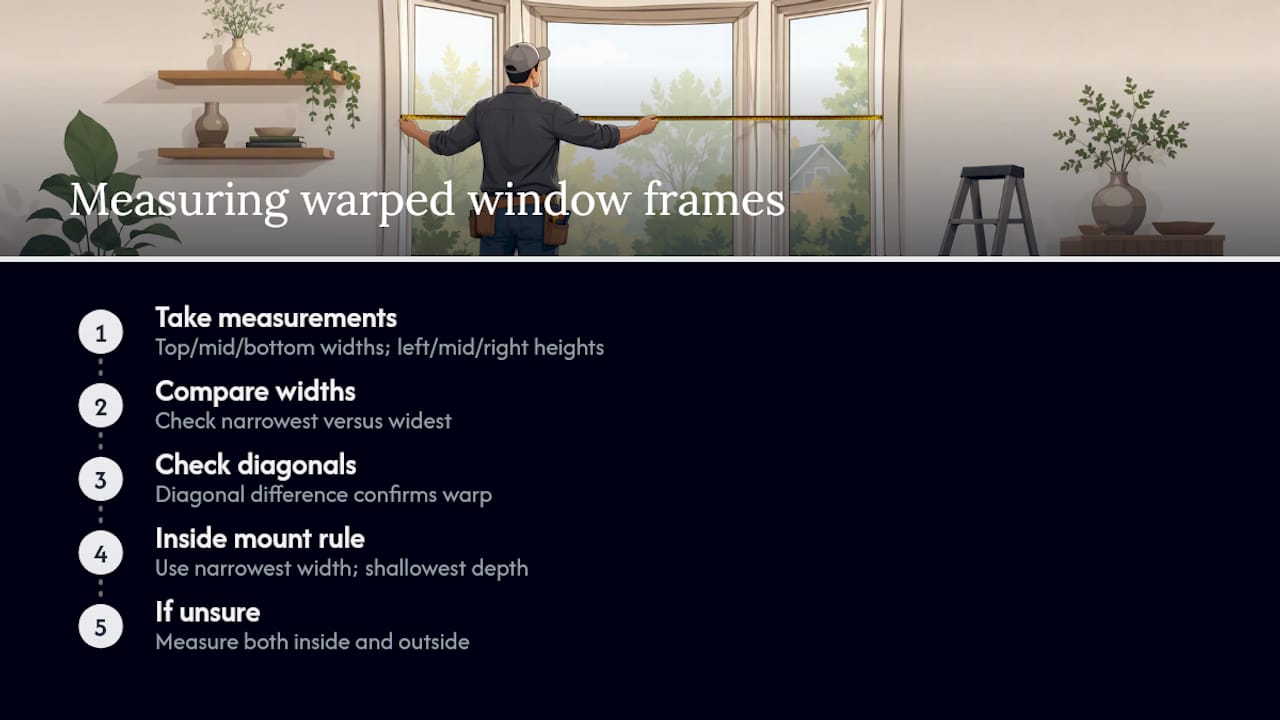
For a warped frame you’re still set on mounting inside, always work from the tightest width and account for any twist in the depth at all three points, not just one corner. A frame that’s 4 inches deep at the top and 3 inches deep at the bottom needs to be treated as a 3 inch depth window. Skipping that check is one of the fastest ways to order a blind that simply won’t sit flush.
When in doubt, take both inside and outside measurements before you commit, so you can compare fit and appearance side by side rather than guessing which will work better.
Making Sense of Home Depot’s Measurement Guidelines
Home Depot backs up its in-store guidance with a printable measurement worksheet and a set of short how-to videos, and both are worth using even if you feel confident measuring on your own.
The worksheet’s real value is the format. It forces you to record measurements in the same order every time (Width x Height x Depth), which prevents the classic mix-up of writing height where width belongs. Bring a printed copy with you, or fill it out digitally, and use one sheet per window so nothing gets crossed between rooms.
The Home Depot how-to videos are especially useful for visual learners, since they show the tape placement in real time for both inside and outside mounts. There’s also a dedicated video for inside-mount horizontal blinds that walks through depth checks and mounting requirements specifically, which is the step most first-timers rush past.
Treat these resources as a second opinion, not a replacement for your own three-point measurements. The worksheet catches transcription errors; it can’t catch a tape measure that slipped a quarter inch. That part’s still on you.
Measuring for Different Blind Materials and Styles
Your measurements don’t change based on material, but what you do with them sometimes does. Faux wood blinds, being thicker and heavier than aluminum, often need slightly more mounting depth, so always check the specific product’s depth requirement before finalizing an inside mount.
Aluminum blinds are thinner and more forgiving in shallow frames, which makes them a solid pick when your depth measurement comes in tight. Because the slats are lightweight, they’re also a common choice for larger windows where a heavier faux wood blind might strain the brackets.
Cellular and roman shades typically mount with a headrail similar to blinds, but stack height (how much fabric bunches at the top when raised) varies by fabric thickness, so leave a bit of extra clearance above the frame if you’re going with a thicker weave. Vertical blinds and sliding panels need that wider headrail allowance covered earlier, since the track itself takes up more room than a standard horizontal headrail.
Whatever material you’re leaning toward, take your core measurements (width, height, depth, all three points each) before you start comparing styles. Nail down the numbers first, then let the material fit those numbers rather than the other way around.
A Simple Workflow for Your First Measuring Trip
Work through it in this order: pick your mount type, check your depth, measure width and height at three points each, photograph and label every window, then double-check every number before it goes in an order. Get a second set of hands for anything wide, high, or awkward to reach, and always put ladder safety ahead of speed.
— Sunny
Verify Your Measurements With Valueblindsdirect’s Design Studio
You’ve done the hard part: three-point measurements, the right rounding, the right mount. Now put those numbers to work without second-guessing yourself. The Window Treatment Design Studio lets you enter your exact W x H x D, preview styles and colors on your actual window dimensions, and catch anything that looks off before you ever hit checkout.

Free fabric swatches ship out so you can check color against your actual walls and light, not a screen. And if a number still feels uncertain, our support team can walk through it with you before the order locks in.
Here’s how Valueblindsdirect backs up the numbers you just took:
- Verification support to double-check your measurements before you order
- Full custom ordering across faux wood, aluminum, cellular, roman, and vertical styles
- Motorized and cordless options for windows where safety or convenience matters most
Browse the full blinds collection and start your Design Studio project today. Your measurements are already done. The rest is just picking what looks great.
Sources
- How To Measure for Blinds and Shades - The Home Depot
- How To Measure for Blinds and Shades (Home Depot video)
FAQ
How Do You Measure for Blinds at Home Depot?
Pick inside or outside mount, then measure width at three points, height at three points, and depth (for inside mounts), using a steel tape to the nearest 1/8 inch. Record everything as W x H x D and use the narrowest width with the longest height.
What’s the Difference Between Inside and Outside Mount Measurements?
Inside mount measurements use the narrowest width, longest height, and frame depth so the blind fits flush inside the opening. Outside mount measurements cover the full desired width plus about 3 inches of overlap, measured from your planned headrail position down.
Do I Need to Add Extra Inches When Measuring for Outside-Mount Blinds?
Yes, add roughly 3 inches total, about 1.5 inches per side, for better privacy and light coverage, along with 2 to 2.5 inches above the opening for the headrail and brackets.
What Tools Do I Need to Measure for Blinds?
You need a steel tape measure, a pencil and paper or worksheet, a ladder for taller windows, and ideally an assistant to help hold the tape and steady the ladder.
How Do I Measure an Uneven or Out-of-Square Window?
Take your standard three-point width and height measurements, then check the diagonal corner-to-corner distances. A noticeable difference between the diagonals signals a warped frame, which usually points to outside mount as the better fit.




,%20then%20measure%20width,%20height,%20and%20depth,%20and%20write%20them%20down%20as%20W%20x%20H%20x%20D.%20Use%20a%20steel%20tape%20measure,%20never%20cloth,%20and%20measure%20to%20the%20nearest%201/8%20inch...)