
3 Measurements to Get Order-Ready Cellular Shades for Homeowners
Three measurements decide whether your cellular shades fit like they were made for your window (they were) or end up an inch too wide: width, height, and depth. Your first big decision is mount type. Inside mount tucks the shade into the window frame and needs at least an inch of depth. Outside mount hangs on the wall or trim and covers the whole opening. Measure each dimension in three spots, and for inside mounts, always record the narrowest one.
TL;DR:
- Inside mount cellular shades require at least ¾ to 1.5 inches of window frame depth, with measurements taken at the narrowest width and shortest height to ensure proper fit.
- Out-of-square windows with diagonal measurement differences exceeding ¼ inch should use outside mount instead of inside, or expect gaps and uneven seating.
- Measurement accuracy depends on rounding down to the nearest ⅛ inch and double-checking dimensions with a second reading before ordering.
- For large or irregular windows, professional measuring may prevent costly remakes and ensure correct compatibility with shade types and mechanisms.
- Outside mount shades allow for flexible coverage but require adding 1.5 to 3 inches overlap beyond the window opening for optimal light blocking and privacy.
Table of Contents
- What You’ll Need Before You Start Measuring
- How to Measure for Inside-Mount Cellular Shades
- How to Measure for Outside-Mount Cellular Shades
- Measuring Special Windows and Tricky Situations
- Common Measuring Mistakes and How to Verify Your Numbers
- How to Report and Format Your Measurements When Ordering
- Author Tips and Value Blinds Measuring Support
- Quick Perspective: DIY Measuring vs. Professional Measuring
- Get Your Measurements Turned Into a Perfect-Fit Order
- Useful Measurement Resources and Official Guides
- Sources
- FAQ
What You’ll Need Before You Start Measuring
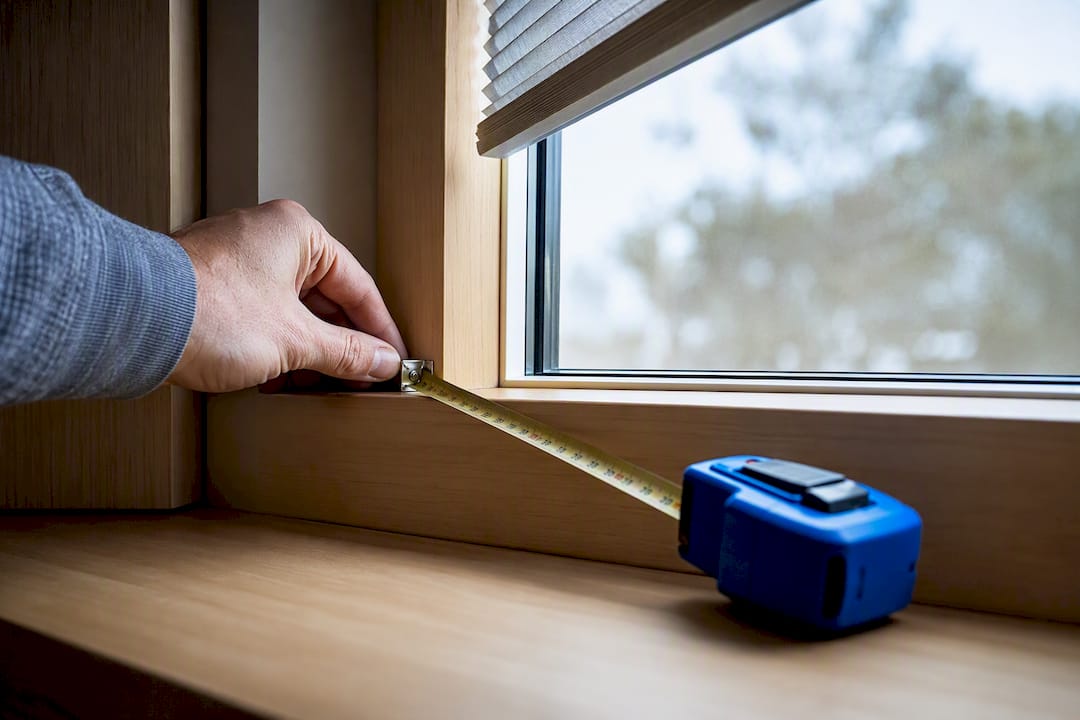
Grab the right tools before you climb that ladder. A metal tape measure is non negotiable. Fabric or cloth tape measures stretch, and a stretched tape means a shade that doesn’t fit. You’ll also want a pencil, a notepad or your phone’s notes app, a step stool or ladder for taller windows, and a helper if you can rope one in (holding a tape measure steady at full extension solo is trickier than it sounds).
A few simple rules will save you from a remake down the road:
- Measure to the nearest ⅛ inch. Many manufacturers won’t accept ⅟16-inch measurements, so don’t bother splitting hairs finer than that.
- Take every measurement in three separate spots, not just once in the middle.
- For inside mounts, always use the narrowest width and shortest height you record. Frames are rarely perfectly square, and using the largest number is how shades end up too tight to install.
- Know your reveal (the depth of the window frame from the front edge to the glass or blind stack behind it). This determines whether inside mount is even possible.
Inside mount and outside mount aren’t interchangeable choices. Inside mount looks cleaner and shows off your trim, but it demands enough reveal depth for the headrail to sit inside the frame. Outside mount is more forgiving of uneven openings and maximizes light and privacy coverage, but it covers up some of your window trim.
Pro Tip: Keep your tape measure’s metal tab hooked on the frame edge, not floating in your hand. A half-inch of slack at the hook is the single most common source of a shade that arrives too small.
How to Measure for Inside-Mount Cellular Shades
Inside mount is the go-to look for most homeowners because it sits flush inside the window frame, but it only works when you have enough depth and reasonably square corners. Here’s the exact sequence.
- Confirm your depth first. Measure from the front of the window frame straight back to the glass or the deepest obstruction (a lock, a crank handle, a sloped sill). Most cellular shades need at least ¾ inch to 1½ inches of clear depth, depending on the headrail style, so check this before you fall in love with a fabric swatch.
- Measure width in three places. Measure the inside-to-inside distance at the top of the opening, the middle, and the bottom of the frame. Manufacturer guidance recommends recording the narrowest of the three, since that’s the width your shade physically has to clear no matter how the rest of the frame flares.
- Measure height in three places. Measure from the top of the frame straight down to the sill (or to the bottom of the opening if there’s no sill) at the left side, the center, and the right side. Standard measuring guidance calls for capturing height at left, middle, and right, and this time you use the shortest of the three so the shade doesn’t jam against an uneven sill.
- Check your depth again at the top of the frame specifically, since that’s where the headrail sits. A window can have plenty of depth at the bottom and almost none at the top if there’s a curtain rod bracket or a security sensor in the way.
- Check squareness by measuring both diagonals, corner to corner. If the two diagonal measurements differ noticeably, your window is out of square, and inside mount may bind or leave visible gaps on one side.
- Round every measurement down to the nearest ⅛ inch unless your specific vendor tells you otherwise. Lowe’s measuring instructions for inside-mount cellular shades note that measurements finer than ⅛ inch typically aren’t usable anyway, so there’s no benefit to eyeballing a ⅟16-inch fraction.
Out-of-square windows deserve their own callout, because they’re more common than people expect. Older homes especially settle over decades, and a frame that looks square to the eye can be off by half an inch corner to corner.
If your diagonals are significantly mismatched, consider switching to outside mount. Inside mount depends on a fairly consistent opening, and forcing an inside-mount shade into a badly out-of-square frame usually means visible light gaps along one edge or a headrail that won’t seat evenly. If you’re set on the clean inside-mount look despite a wonky frame, order to the narrowest width and shortest height, and expect a slightly uneven gap on the wider side. It’s the safer trade-off compared with a shade that doesn’t fit at all.
For readers who’ve measured for inside-mount blinds before, the process for inside mount blinds follows nearly identical logic. Cellular shades just add the headrail depth check since honeycomb fabric stacks up thicker than a slat blind when fully raised.
How to Measure for Outside-Mount Cellular Shades
Outside mount changes the whole equation. Instead of fitting inside a frame, the shade hangs on the wall or trim around the window, so you’re measuring for coverage, not for a snug fit inside an opening.
- Decide how much coverage you actually want. Do you want the shade to just cover the window opening, or extend further onto the wall for better light blockage and privacy? This decision comes before any tape measure comes out.
- Measure the width of the area you want the shade to cover, from where the fabric should start on one side to where it should end on the other. This is measured across the outside surface (trim or wall), not inside the frame.
- Add overlap on each side. Overlap recommendations vary by installer preference and desired coverage, but a common approach is adding roughly 1.5 to 3 inches per side beyond the window opening to close light gaps at the edges. Add a sufficient allowance at the top so the headrail mounts above the opening rather than right at its edge.
- Measure the height from where you want the top of the headrail mounted down to your desired stopping point, whether that’s the windowsill, the apron below it, or the floor for a floor-length look.
- Note any obstructions along your mounting line: outlets, light switches, baseboard heaters, or trim moldings that stick out further than the wall surface. These can force you to mount higher or add spacers behind the brackets.
A few extra considerations round out an outside-mount measurement:
- Trim and molding depth matters even when you’re not mounting inside the frame. If your trim protrudes an inch off the wall, your brackets need to clear it, which sometimes means shimming the headrail forward.
- For windows wider than roughly 84 inches to 96 inches (this varies by fabric and headrail type), splitting the opening into two or more separate shades is usually more practical than ordering one oversized unit. Multiple narrower shades also operate more smoothly than one wide one, since a single wide honeycomb panel can sag or bind over time.
- When splitting a large opening, measure and order each section independently rather than dividing one large measurement in half. Windows are rarely perfectly symmetrical, and treating each section as its own project catches those small differences.
- Leave clearance for handles, cranks, or wands on operable windows so the mounted shade doesn’t block the hardware you actually need to use.
Outside mount is also the fallback move for windows that fail the squareness check for inside mount, or for frames with less depth than your chosen shade’s headrail requires.
Measuring Special Windows and Tricky Situations
Not every window is a clean rectangle, and the standard steps above need adjusting for a few common shapes.
- Arched or angle-top windows. Standard cellular shades can’t follow a curve, so most arched windows get a shade sized to cover the rectangular portion below the arch, with the arch left uncovered or fitted with a separate custom arch treatment. Measure the straight-sided rectangular section using the normal three-point method.
- Bay and bow windows. Treat each pane as its own separate window. Measure width and height independently for each section, and decide per-panel whether inside or outside mount works better, since angled bay walls sometimes leave too little depth for inside mount on the side panels even when the center panel has plenty.
- Skylights and hard-to-reach high windows. Depth and access both matter here. If you can’t comfortably reach the shade to raise or lower it by hand, this is where a motorized cellular shade genuinely earns its higher price tag rather than being a luxury add-on. Measure the same width, height, and depth steps, but double check depth carefully since skylight frames often have shallower reveals than standard vertical windows.
- Windows with obstructions in the frame. Locks, cranks, security sensors, or old paint buildup inside the frame can eat into your usable depth or width. When an obstruction leaves less than the minimum required depth for inside mount, switch to outside mount rather than trying to notch the headrail around it.
For any window that doesn’t fit the standard rectangular pattern, a template or a quick photo sent to customer support beats guessing. Custom shapes are exactly where DIY measuring most often goes wrong, and a five-minute conversation with someone who measures windows for a living can save you an entire remake cycle.
Common Measuring Mistakes and How to Verify Your Numbers
The single most common error is measuring the window frame’s outer trim instead of the actual opening. Trim measurements and opening measurements can differ by an inch or more, and that difference is exactly the gap between a shade that fits and one that doesn’t. A close second: swapping width and height labels when writing numbers down, which is an easy slip when you’re balancing a tape measure, a pencil, and a ladder rung all at once.
Other frequent mistakes worth watching for:
- Measuring only once instead of at three points, then missing an out-of-square frame entirely.
- Skipping the depth check and later discovering the headrail doesn’t clear a crank handle or sloped sill.
- Forgetting to remeasure after paint or new trim was added, since a fresh coat of trim paint can shave a real fraction of an inch off your reveal.
- Rounding up instead of down, which can turn a shade that should fit snugly into one that binds.
Before you submit an order, run a quick verification pass. Remeasure each dimension a second time on a different day if you can, since morning light versus evening light changes how easy it is to see frame edges clearly. Have a second person confirm your numbers, especially the depth measurement, since that’s the one most often rushed. Recheck your diagonals one more time. If you’re still unsure, cut a piece of cardboard to your recorded width and height and test-fit it in the opening. It sounds low tech, but it catches errors that a tape measure alone can miss.
Pro Tip: If your cardboard mock-up feels tight anywhere along the edge, size down and go outside mount. A shade that’s a hair too big for an inside-mount opening won’t budge; one built for outside mount has forgiving overlap built in.
How to Report and Format Your Measurements When Ordering
Order forms and customer support lines both want the same thing: unambiguous numbers in a consistent format. Write your measurements as width times height (W × H), always in that order, in inches. State your mount type explicitly (inside or outside), since the same width and height numbers get cut differently depending on which one you choose.
Include these details every time you submit an order:
- Width and height in the W × H format, in inches, rounded per your vendor’s rule (commonly nearest ⅛ inch, rounded down).
- Mount type: inside or outside.
- Depth or reveal measurement, especially for inside mounts.
- Any note about an out-of-square frame, an obstruction, or a diagonal difference you measured.
- Labeled left, middle, and right (or top, middle, bottom) readings if the order form has separate fields for them, rather than one averaged number.
A quick photo of the window with your tape measure in frame, or a rough sketch with numbers written on it, clears up more confusion in thirty seconds than a paragraph of typed description. Label which side of the sketch is which, especially for bay windows or multi-panel openings where “left” and “right” can get confusing fast. Keep a copy of everything you send. If a remake conversation ever comes up, having your original measurements on hand makes that conversation a lot shorter.
Author Tips and Value Blinds Measuring Support
I’ve walked more homeowners through this exact process than I can count, and the mistake I see most isn’t a math error, it’s confidence. People eyeball a window they’ve looked at for ten years and assume they know its dimensions, then skip the three-point check that would have caught a half-inch flare at the bottom of the frame.
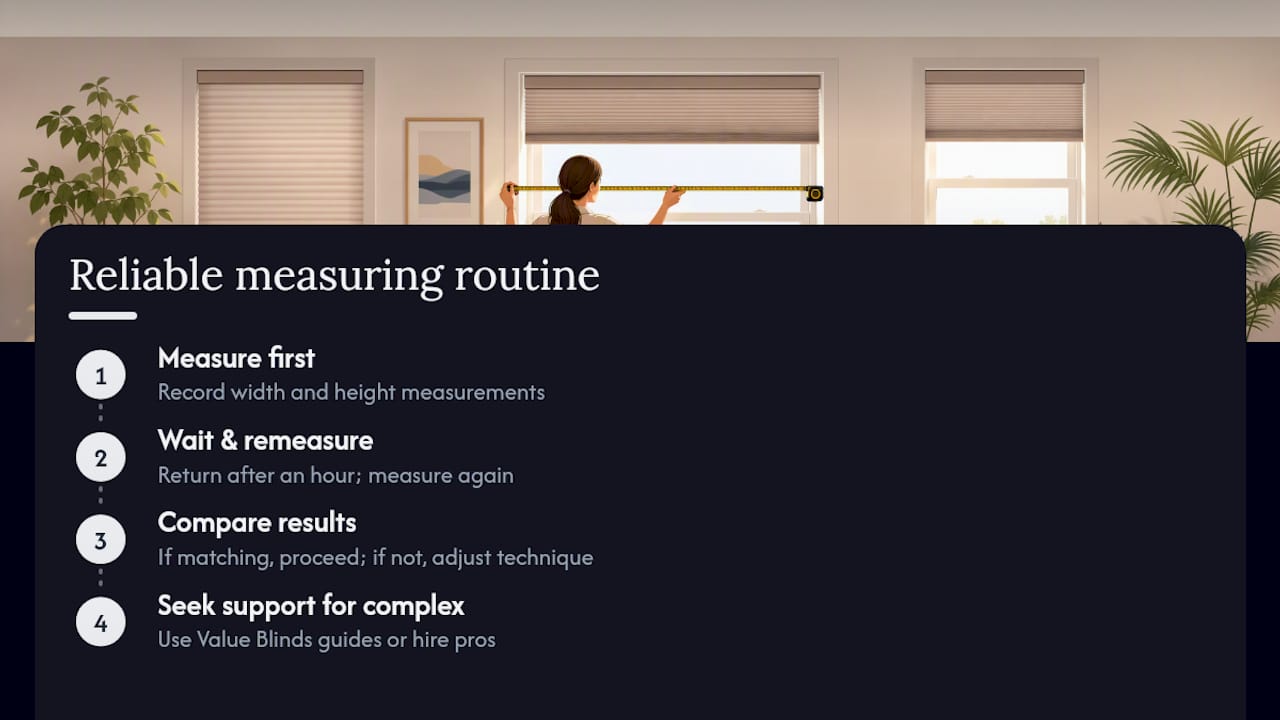
My shortcut: measure once, walk away, come back an hour later, and measure again without looking at your first numbers. If they match, you’re solid. If they don’t, something in your technique needs adjusting, not just a lucky third attempt.
Value Blinds keeps measurement worksheets and step-by-step guides available so you’re never measuring from memory alone, and the design studio walks you through entering your numbers correctly for your specific product. For bay windows, arched frames, or challenging window shapes, professional measuring can help confirm mount feasibility, check depth requirements, and identify potential issues.
Quick Perspective: DIY Measuring vs. Professional Measuring
Standard rectangular windows, reasonably square, with decent depth? DIY measuring works, full stop. Follow the three-point method, respect the rounding rules, and you’ll get an order-ready number without paying anyone else to do it.
Where I’d push back on the “just measure it yourself” confidence you see everywhere online: complex installs change the math. Motorized shades often have larger headrails with tighter depth tolerances. Bay windows and arched frames introduce angles a flat tape measure doesn’t handle gracefully. And here’s the part people underestimate. Warranty coverage on a made-to-measure product often assumes accurate customer-submitted measurements, so a shade that doesn’t fit because of a measuring error isn’t always a straightforward return. For anything outside a standard window, the cost of professional measuring is cheap insurance against a remake, a shipping delay, and a frustrating support call.
— Sunny
Get Your Measurements Turned Into a Perfect-Fit Order
Measuring is only half the job. The other half is turning those numbers into a shade that actually shows up looking right, and that’s where Value Blinds does the heavy lifting other retailers leave to you. Order free fabric swatches before you commit to a color, use the measurement worksheets to double check your numbers, and lean on real customer support if a bay window or an out-of-square frame has you second-guessing your tape measure.
Once your width, height, and depth are locked in, the Window Treatment Design Studio walks you through applying them to the right product, whether that’s a manually operated shade or a motorized day and night cellular shade for a hard-to-reach window. Browse the full cellular shades lineup, request your swatches, and place an order backed by measuring support instead of guesswork.
Useful Measurement Resources and Official Guides
For made-to-measure orders, always defer to the exact template your manufacturer provides rather than a general rule of thumb. The Bali measuring guide for cellular and pleated shades lays out headrail depth minimums by product line. The Blinds.com measuring guide covers squareness checks and outside-mount overlap in more visual detail than most vendor PDFs. And Lowe’s instructions for inside-mount cellular shades spell out rounding conventions clearly if you’re unsure which direction to round. For a broader look at DIY window measuring across shade types, the site’s own guide to measuring windows for shades is a solid companion read.
Sources
- Measuring Guides for Blinds, Shades & Shutters
- Inside mount cellular shades measure for - Lowe’s PDF
FAQ
What Are the Drawbacks of Cellular Shades?
Cellular shades trap air well for energy efficiency, but their honeycomb fabric can collect dust in the pleats and isn’t as easy to spot-clean as a smooth roller shade. Corded versions also carry the same child-safety concerns as other corded window coverings, which is why cordless and motorized options have become the more popular pick for many households.
How Do I Measure for No-Drill Cellular Shades?
No-drill (tension or clip-mount) cellular shades still need the same three-point width and height measurements as a standard inside mount, plus a depth check to confirm the frame has enough flat surface for the mounting brackets or tension rods to grip securely.
Should I Round My Measurements Up or Down?
Round down to the nearest ⅛ inch for inside-mount shades unless your specific manufacturer’s instructions say otherwise, since many vendors don’t accept measurements finer than ⅛ inch and rounding up risks a shade that binds in the frame.
How Do I Know if My Window Is Out of Square?
Measure both diagonals of the window opening, corner to corner. If they differ by more than about ¼ inch to ⅜ inch, the frame is noticeably out of square, and you should measure to the narrowest width and shortest height, or consider outside mount instead.
Can I Measure for Cellular Shades Without a Helper?
Yes, though a helper makes holding the tape measure taut at full extension easier, especially for wider windows. Value Blinds’ measurement worksheets and the design studio are built to guide solo measurers through the process step by step.
Recommended
- Cellular vs Roller Shades for Homeowners
- Window treatment sizing tips: measure for a perfect fit
- How to Order Custom Shades Online for Your Home
- How Custom Shade Sizing Is Determined: A Homeowner’s Guide

Value Blinds®
Trusted window treatments provider
Value Blinds® is a trusted provider of Greenguard, OEKO-TEX, and FSC-certified window treatments based in Portland, Oregon. Specializing in sustainable, motorized, smart-controlled, and outdoor-ready blinds and shades, the company is built on a foundation of simplified shopping, premium eco-friendly materials, and transparent pricing without the inflated cost.