
Blind Bracket Types Explained: Which One You Need
Most blinds use one of a few bracket types: standard (universal) brackets, which hold the headrail at each end, plus center support brackets for wide blinds, extension brackets for spacing, and specialty clips for cassettes or window frames. Which one you use depends on where the blind mounts (inside the window frame, outside on the wall or trim, or on the ceiling) and what style of blind you own. Here’s how to tell them apart, match them to your blinds and put them up safely. 🪟
TL;DR
- Standard (universal) brackets are the workhorse: two per blind, one at each end of the headrail, for inside, outside or ceiling mounting.
- Center support brackets keep wide blinds from sagging. Extension (spacer) brackets push a blind out to clear trim, handles or crank hardware.
- Inside mount vs. outside mount changes where the bracket screws in, not the basic bracket idea. Inside uses the top of the frame. Outside uses the wall or trim above it.
- To replace a bracket, photograph it next to a ruler and measure the headrail. Don’t assume brackets from different blinds are interchangeable.
- Match your screws to your wall (wood, drywall, plaster, masonry) and keep cords short and out of reach of kids.
Table of Contents
- What a blind bracket actually does
- The main blind bracket types
- Quick comparison: which bracket for which job?
- Inside mount vs. outside mount brackets
- Which brackets go with which blinds?
- How to identify the bracket you already have
- How to check a bracket fits and holds
- Installing brackets the right way
- Cord safety around brackets and blinds
- Our perspective
- Want it measured and mounted for you?
- Common bracket mistakes (and easy fixes)
- FAQ
- Sources
What a blind bracket actually does
A bracket is the small piece of hardware that connects the headrail (the box or tube at the top of your blind) to your window frame, wall or ceiling. It carries the full weight of the blind, takes the pull every time you raise or lower it, and keeps the whole thing level.
That sounds like a lot for a little piece of metal or plastic, and it is. A bracket that’s the wrong type, mounted in the wrong material or spaced too far apart is the number one reason blinds droop, pop loose or won’t latch. Let’s go through the types so you can pick (or identify) the right one.

The main blind bracket types
Standard or universal brackets
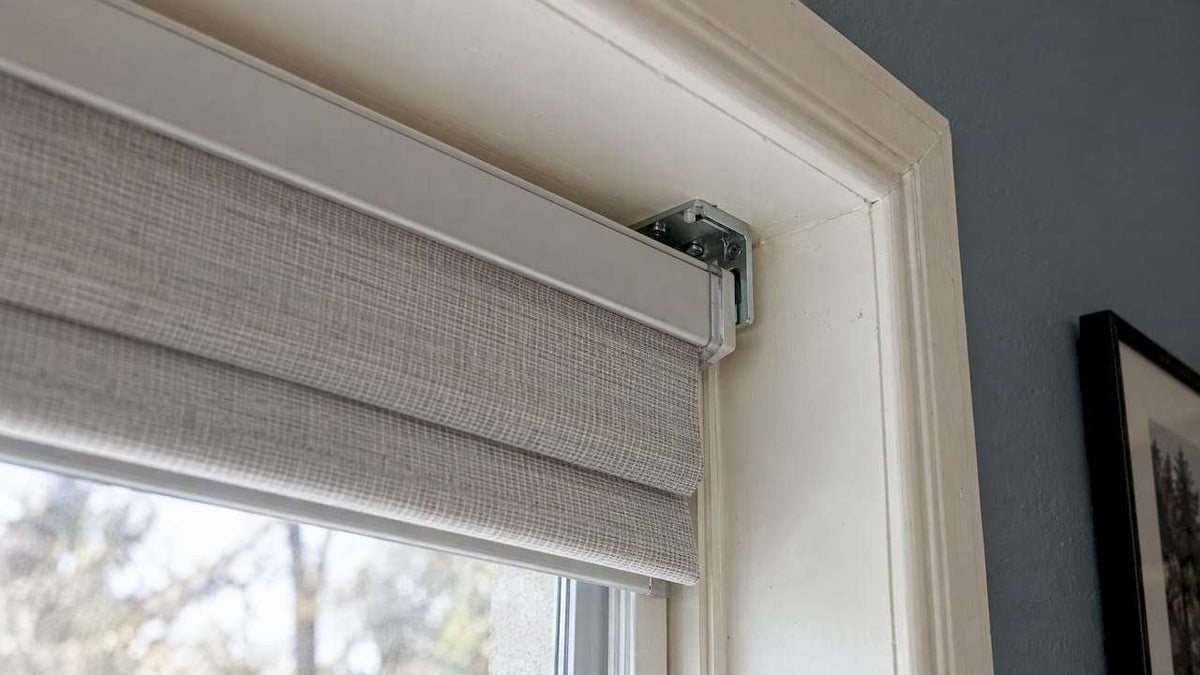
These are the ones you’ll see most often. A standard bracket is usually a small L-shaped or boxy piece with screw holes on one side and a slot or clip that grips the headrail on the other. You use two, one near each end of the blind.
Most universal-style brackets can mount to the ceiling, the wall or inside the window casing, depending on which face of the bracket you screw down. That flexibility is why they come with so many blinds. If you’re not sure where to start, this is usually the bracket in your box.
Center support brackets
Once a blind gets wide, two end brackets aren’t enough. The headrail can bow in the middle, and the blind may bind as you operate it. A center support bracket sits halfway along the headrail and holds it up.
A common rule of thumb is to add a center support once a blind passes roughly 36 inches wide, and another for very wide blinds, but the exact number depends on the blind type and material. Always follow the instructions that came with your product. Heavier materials, like solid wood, usually need more support than lightweight aluminum.
Extension or spacer brackets
Sometimes the window just isn’t friendly. Maybe a crank handle sticks out, the trim is deep, or a window sill is too shallow. Extension brackets (also called spacer or offset brackets) push the headrail forward so the blind clears the obstacle. They’re also handy for outside mounts when the wall has molding the blind needs to hang in front of.
Clip-in and snap-in brackets
Many modern shades use brackets with a latch or clip. You screw the bracket up first, then the headrail snaps or slides in, and a small release tab lets you take it down again for cleaning. Roller shades, cellular shades and many cordless products work this way. Before you buy replacements, confirm the headrail can latch and release cleanly without anything blocking the mechanism.
Face-fit and top-fit brackets
Some headrails are designed to be mounted from the front face of the headrail, others from the top. These brackets are made for one orientation or the other. The most common mix-up happens when someone buys a bracket that fits the headrail profile but screws in from the wrong side for their window setup.
Valance clips and return brackets
Blinds with a decorative valance (the strip that hides the headrail) often use small clips or return pieces that attach to the main bracket. These aren’t load-bearing, but they’re part of the bracket system, and if one’s missing, the valance won’t sit right.
Heavy-duty and specialty brackets
Vertical blinds, wide wood blinds and motorized shades can weigh more than a typical roller shade, so they often ship with sturdier brackets or extra ones. Motorized products also need space for the motor and sometimes a power connection. If you’re going that route, our motorized blinds installation guide walks through it.
Quick comparison: which bracket for which job?
| Bracket type | Best for | Where it mounts | Watch out for |
|---|---|---|---|
| Standard / universal | Most blinds and shades | Inside frame, wall or ceiling | Check that the headrail profile matches |
| Center support | Wide blinds, heavy headrails | Same surface as end brackets | Must sit level with the end brackets |
| Extension / spacer | Handles, deep trim, shallow sills | Wall or ceiling | Adds projection from the wall |
| Clip-in / snap-in | Shades you take down to clean | Any approved surface | Latch and release must move freely |
| Heavy-duty | Wood, vertical, motorized | Studs or proper anchors | Use fasteners rated for the weight |
Inside mount vs. outside mount brackets
This is where most people get confused, so let’s clear it up. Inside and outside mounting are about where the blind hangs. The bracket types above can often serve either one.

Inside mount means the blind sits within the window frame. The brackets screw into the top of the frame (the inside ceiling of the opening). You get a clean, built-in look, but you need enough frame depth for the headrail, and the window must be square enough for a snug fit.
Outside mount means the blind hangs on the wall or trim above and around the window. The brackets screw into the wall, the trim or the ceiling. Outside mounting is a good answer when the frame is too shallow, has handles in the way, or when you want to cover more glass and block more light at the edges.
For measuring, the major retailers give similar advice. For an outside mount, Home Depot’s install guide suggests measuring trim to trim and considering about 3 extra inches for coverage. For vertical blinds, it has you mark the headrail position about 4 inches in from each end, then line up the first bracket with that mark.
Not sure which mount is right for your window? Our Perfect Fit measurement guide and measurement tool help you decide and measure correctly.
Which brackets go with which blinds?
Different blinds lean on different bracket setups. Here’s the general picture:
- Roller shades and zebra shades: Usually clip-in or snap-in brackets at each end. Wider shades may need a center support, and the brackets must match the headrail or cassette profile.
- Cellular (honeycomb) shades: Lightweight headrails that typically use small clip brackets, often with a ceiling or inside mount option.
- Roman shades: Often hung from a mounting board or from brackets with a fixed headrail. Fabric weight matters, so check the instructions for how many brackets you need.
- Faux wood, wood and bamboo blinds: Heavier headrails, so expect sturdier brackets and a center support on wider widths.
- Aluminum (mini) blinds: Light, with simple standard brackets that often use a small hinged cover to hide the screws.
- Vertical blinds: Long, heavy headrails, so brackets are spaced along the track, and the right fasteners matter a lot.
If you’re shopping, our blinds collection and vertical blinds pages show the styles side by side.
How to identify the bracket you already have
Say you’ve moved into a home with blinds already up, or a bracket cracked and you need a new one. Here’s the quick way to figure out what you’ve got. One retailer’s repair guide suggests photographing the hardware next to a ruler, measuring the headrail profile and noting any brand name or order number, since brand names alone may not be enough because manufacturers revise parts.
Here’s a simple routine:
- Take photos from the front, top and side of the bracket, with a ruler in the shot.
- Measure the headrail height and depth (the profile), plus the bracket’s width and screw hole spacing.
- Look for markings on the headrail, a sticker on the back or a stamp on the bracket.
- Note how it releases. Is there a tab to push, a spring clip to lift or a slot to slide?
- Keep the old bracket until the new one is mounted so you can compare.
One more thing: don’t assume parts from different blinds are interchangeable. Even brackets that look identical can differ by a millimeter or two, and that’s enough to keep a headrail from latching. If you’re replacing a blind altogether, a custom order made to your window dimensions with matching hardware sidesteps the guesswork entirely.
How to check a bracket fits and holds
Before you drill, run through this list:
- Interface: Does the bracket match your headrail’s shape and latch style?
- Release: Can the headrail latch in and release without anything blocking the mechanism?
- Surface: Is the mounting surface solid enough? Wood, drywall, plaster and masonry each call for different fasteners.
- Fasteners: Use the screws or anchors that suit your wall. Our guide to matching anchors before you drill breaks that down by material.
- Product instructions: Follow what came with your blind. Don’t bypass cord-safety devices or improvise brackets, and leave electrical repairs on motorized products to a qualified person.
Installing brackets the right way
The full process is in our how-to-install-blinds guide, but here’s the short version:
- Mark your spots. Hold the blind (or headrail) where it will hang, and mark where the end brackets go. Add marks for center supports if you have them.
- Use a level. Check each mark against a level or laser line. A bracket that’s off by a hair becomes a crooked blind.
- Pre-drill. Small pilot holes prevent split wood and wandering screws. In drywall or masonry, use the right anchors.
- Fasten the brackets. Snug, not cranked. Over-tightening can crack plastic brackets or strip holes.
- Seat the headrail. Click or slide it in, then confirm it’s secure by operating it a few times.
- Check clearance. Make sure the blind moves freely and doesn’t rub on handles, sills or trim.
Prefer to skip the drill? There are options. Our no-drill blinds guide and easy-install blinds guide cover the simpler routes.
Cord safety around brackets and blinds
Brackets aren’t just about looks. Safety matters here. The U.S. Consumer Product Safety Commission warns that children have strangled on window covering cords, even with an adult nearby, and it encourages buying cordless window coverings, which are widely available. 👶
If you have corded blinds in a home with young kids, the CPSC’s guidance includes these steps:
- Move cribs, beds, furniture and toys away from windows and cords.
- Keep pull cords as short as possible.
- Make sure cord stops sit about 1 to 2 inches from the headrail when the blind is fully lowered.
- Anchor continuous-loop cords to the floor or wall using fasteners suited to the surface, with the cord taut but still operable.
A continuous-loop anchor or cord tensioner is a kind of bracket too, so it needs a solid mounting surface just like the main brackets.
Our perspective
We see bracket problems all the time, and almost none of them are “bad blinds.” They’re a mismatch: the wrong mounting surface, a skipped center support, or a bracket swapped in from another product. 🔧
That’s why we put so much into the stuff around the blind: measurement guides, a measurement tool, and professional measuring and installation for people who’d rather hand off the ladder. A made-to-order blind sized to your window and delivered with its own hardware takes a lot of the guesswork out.
Our advice? Decide inside or outside mount first, check what your wall is made of, and follow the instructions for the exact blind you’re hanging. Go cordless wherever you can, especially in kids’ rooms. Do those three things and your brackets will quietly do their job for years.
Sunny
Want it measured and mounted for you?
If brackets, anchors and levels aren’t how you want to spend a weekend, we offer professional measuring and installation so your blinds go up right the first time. You can also browse custom blinds and shades in styles from roller and zebra to cellular, Roman, wood and vertical, with free swatches to help you choose.

Start with the measurement tool, pick your mount, and we’ll take it from there. ✨
Common bracket mistakes (and easy fixes)
- Skipping the center support on a wide blind. The headrail sags and the blind binds. Add the support, level with the end brackets.
- Mounting into drywall with no anchor. Screws pull out under load. Hit a stud, or use an anchor rated for the weight.
- Mixing brackets between products. They may look the same but not latch. Use the hardware made for your blind.
- Choosing inside mount on a shallow frame. If the headrail doesn’t fit, switch to an outside mount or use extension brackets.
- Over-tightening screws. Plastic cracks and holes strip. Snug is enough.
- Leaving cords long. Shorten them, use cord stops and consider cordless.
For more on this topic, see our write-up on the role of mounting brackets in blind stability.
FAQ
What are the most common types of blind brackets?
The most common are standard (universal) brackets, center support brackets, extension or spacer brackets, and clip-in brackets that let the headrail snap in and out. Heavy-duty versions are used with wood, vertical and motorized blinds. Most blinds ship with the brackets they need.
Can I use any bracket with any blind?
No. Brackets need to match the headrail profile and the latch or release style, and brands revise parts over time. Confirm the exact product and bracket interface before you buy, and keep the old bracket to compare.
How many brackets does a blind need?
Two end brackets is the minimum. Wider or heavier blinds usually need one or more center supports. The right number depends on the blind’s width, weight and type, so follow the instructions for your product.
Do inside and outside mounts use different brackets?
Often the same bracket works for both; what changes is the surface you screw into. Inside mounts go into the top of the window frame, while outside mounts go into the wall, trim or ceiling. Extension brackets are common for outside mounts or tricky windows.
What’s the safest way to hang blinds around kids?
Choose cordless blinds when you can. If you have cords, keep them short, set cord stops properly, anchor continuous loops and move cribs and furniture away from windows, as the CPSC recommends.
Sources
- How to Install Blinds or Shades, The Home Depot
- Window Covering Cords, U.S. Consumer Product Safety Commission
- How to Find Replacement Blind and Shade Brackets and Hardware