

Blinds to Go Measuring Guide for a Perfect Fit
TL;DR:
- Accurate measurement is crucial for custom blinds, with many errors stemming from overconfidence and rushing.
- Measuring twice at multiple points and recording precise fractions of an inch helps prevent fitting issues and returns.
- Using a rigid tape measure, deciding mount type beforehand, and noting obstructions ensure a perfect fit on the first try.
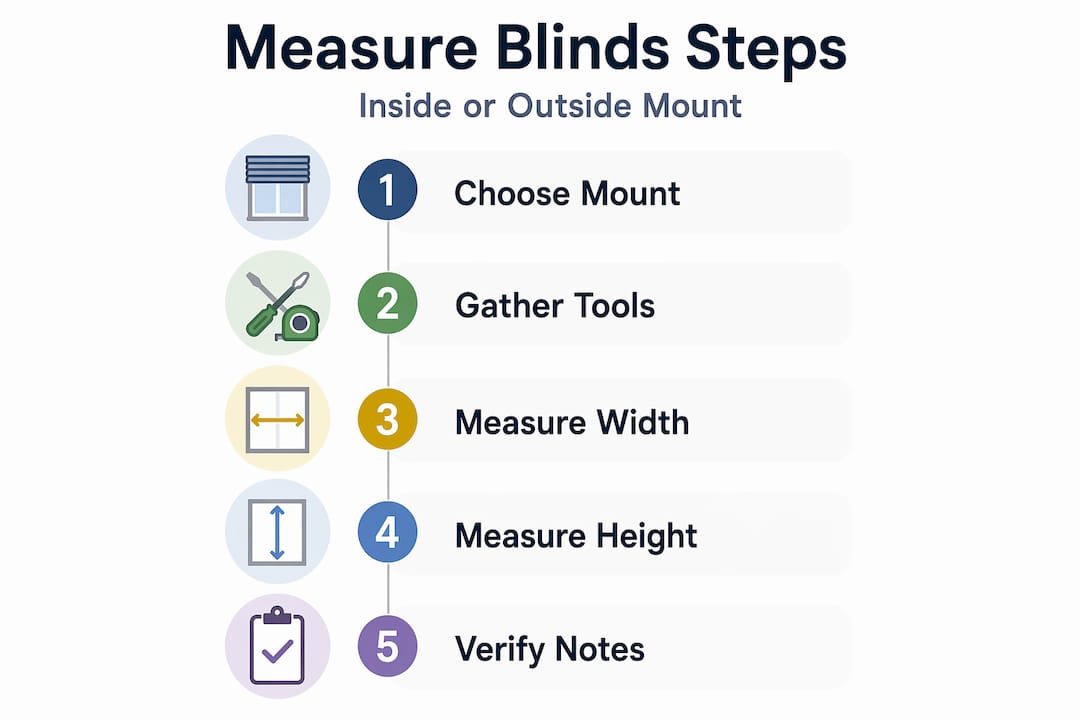
Getting custom blinds right starts long before you click “add to cart.” This blinds to go measuring guide exists because measurement errors are the top cause of blind returns and reorders in online retail. Order the wrong size and you’re either living with light gaps on the sides or struggling to cram blinds into a frame they were never meant to fit. The good news is that measuring windows accurately is a skill anyone can learn in under an hour, and this guide walks you through every step, from tools to final verification.
Table of Contents
- Key takeaways
- Tools and preparation for measuring
- Measuring for inside mount blinds
- Measuring for outside mount blinds
- Common mistakes and how to avoid them
- How to verify measurements before ordering
- My honest take on getting measurements right
- Get your perfect fit with Valueblindsdirect
- FAQ
Key takeaways
| Point | Details |
|---|---|
| Measure width three times | Take measurements at the top, middle, and bottom of the frame and always use the smallest number. |
| Inside vs. outside mount matters | Your mount choice changes how you measure, so decide before you pick up the tape. |
| Add overlap for outside mounts | Add 1.5 to 2.5 inches on each side of the frame to block light gaps on outside mount blinds. |
| Record and annotate everything | Write down each measurement with notes on mount type to avoid ordering errors. |
| Re-measure before ordering | Always verify your numbers on a second pass before submitting a custom order. |
Tools and preparation for measuring
Before you touch a tape measure, spend five minutes getting set up. The right preparation is what separates a clean measurement from a frustrating one.
What you need
- A steel tape measure (not a cloth one). A rigid tape reduces sag and distortion inside narrow window recesses where fabric tape bends and gives you false readings.
- A pencil and notepad, or your phone’s notes app.
- A step stool if your windows are high.
- A level, especially if you suspect your frames are not perfectly square.
Inside mount vs. outside mount: decide first
This decision shapes everything else about how you measure. Inside mount blinds sit inside the window frame, fitting flush with the wall for a clean, built-in look. Outside mount blinds attach to the wall or trim above the window and cover the entire frame from the outside.
If your window frame is shallow, has obstructions like handles or cranks, or lacks a flat mounting surface, outside mount is often the better call. Write your choice down before you start measuring.
| Checklist Item | Notes |
|---|---|
| Steel tape measure | Rigid, at least 12 feet long |
| Pencil and notepad | For recording measurements with annotations |
| Step stool | For high windows or upper frame measurements |
| Level | To check for out-of-square frames |
| Mount type decision | Inside or outside, confirmed before measuring |
Pro Tip: Check for window obstructions like crank handles, locks, or deep sills before choosing inside mount. If the hardware protrudes more than an inch into the recess, outside mount will give you a cleaner result.
Measuring for inside mount blinds
Inside mount measurements must be precise. You are working inside the frame, so there is no room for rounding up. Take three width measurements at the top, middle, and bottom of the window opening, then use the smallest number. This accounts for frames that are not perfectly parallel, which is more common than you might expect in older homes.
Step-by-step inside mount process
- Measure the width at the top of the window opening, from the inside left edge to the inside right edge. Record it.
- Measure the width at the middle of the window opening. Record it.
- Measure the width at the bottom of the window opening. Record it.
- Use the smallest of the three numbers. This is your order width.
- Measure the height from the top of the inside frame to the windowsill. Measure on the left, center, and right. Use the smallest number.
- Record measurements in fractions of an inch, down to the nearest 1/8 inch. Custom blinds are cut to exact dimensions, so “about 36 inches” will not work.
- Note any obstructions inside the frame, such as window handles, locks, or casement cranks that could block the blind from opening or closing fully.
Pro Tip: Never round up on inside mount measurements. Most manufacturers already deduct a small amount from your stated width to allow the blind to fit without binding. If you round up, you may end up with a blind that cannot mount at all.
| Step | Correct approach | Common mistake |
|---|---|---|
| Width measurement | Measure at three heights, use smallest | Measure once at center only |
| Height measurement | Measure at three widths, use smallest | Measure from outside the frame |
| Recording | Fractions of an inch (e.g., 35 3/8") | Rounding to nearest whole inch |
| Obstructions | Note and plan around them | Ignore until installation day |
Measuring for outside mount blinds
Outside mount gives you more flexibility on coverage and works on windows where inside mounting is not possible. The trade-off is that you are responsible for adding the right amount of extra width and height. No manufacturer formula will account for your specific walls, trim, or window style. You have to think it through yourself.
Step-by-step outside mount process
- Decide how wide you want the blind. The standard recommendation is to add 1.5 to 2.5 inches on each side of the window frame width. So if your frame is 30 inches wide, your blind should be between 33 and 35 inches wide.
- Measure the total width from your planned left edge to your planned right edge, including the overlap.
- Decide where the blind will mount vertically. Most people mount 2 to 4 inches above the top of the window frame to make the room feel taller.
- Measure the height from your planned mounting point down to where you want the blind to end. If you want the blind to cover the sill, measure to the sill. If you want it to hang below, account for that.
- Check your wall space and casing. Measuring from outside edges and checking clearance avoids interference from trim, molding, or door handles nearby.
- Record your final width and height with a note that these are outside mount dimensions.
| Blind style | Recommended extra width per side | Recommended extra height above frame |
|---|---|---|
| Roller shades | 1.5 to 2 inches | 2 to 3 inches |
| Faux wood blinds | 2 to 2.5 inches | 2 to 4 inches |
| Cellular shades | 1.5 to 2 inches | 2 to 3 inches |
| Roman shades | 2 to 2.5 inches | 3 to 4 inches |
Pro Tip: Take a photo of your window with a tape measure visible in the frame. This gives you a reference image if questions come up when you place your order, and it takes about 30 seconds.
Common mistakes and how to avoid them
Even experienced DIYers make these errors. Knowing what to watch for cuts your chance of a bad order significantly.
- Measuring only once. A single measurement gives you no way to catch errors. Always measure at least twice, ideally on different days or with a second person confirming.
- Ignoring out-of-square frames. Many windows, especially in homes built before 1980, are not perfectly rectangular. If your width measurements at the top and bottom differ by more than 1/4 inch, note that on your order form and contact the retailer.
- Rounding to the nearest inch. Custom blinds are cut in fractions. Rounding 35 5/8 inches up to 36 inches can mean a blind that simply won’t fit inside the frame.
- Forgetting about obstructions. Casement cranks, security locks, and deep sills can all prevent inside mount blinds from functioning after installation. Check the full path the blind will travel, top to bottom.
- Confusing inside and outside mount measurements on the order form. An inside mount width of 32 inches and an outside mount width of 32 inches are completely different products.
“Measure twice, cut once” is old carpentry advice, but it applies to window blinds just as directly. The cost of re-measuring is zero. The cost of a wrong order is real.
Pro Tip: For arched windows, bay windows, or sliding glass doors, sketch a quick diagram before measuring. Label each section separately. Unusual shapes need individual measurements, not one measurement for the whole opening.
How to verify measurements before ordering
Re-measuring is the last line of defense before you commit to a custom order. Experts consistently advise measuring twice, on different days or with a second person, to confirm accuracy.
Before you finalize your order, run through this checklist:
- Width measured at three points, smallest number recorded
- Height measured at three points, smallest number recorded
- Mount type clearly labeled (inside or outside)
- Measurements recorded in fractions of an inch
- Obstructions noted and accounted for
- Photo of window taken with tape measure for reference
- Order form reviewed for mount type and dimensions
Clear labels and notes on your measurement form help the fabricator process your order correctly and reduce the chance of a miscommunication. If you are ordering multiple blinds for multiple windows, label each set of measurements by room and window position (e.g., “Living Room, Left Window”).
If your home has unusually complex windows or structural quirks you are not confident measuring around, professional measurement services account for out-of-square frames, window obstructions, and mounting hardware that most DIYers miss.

Pro Tip: Screenshot or print your final measurements and keep them with your order confirmation. If a replacement or warranty claim ever comes up, having the original documented measurements saves significant back-and-forth.
My honest take on getting measurements right
I’ve watched homeowners go through the whole process of choosing beautiful blinds, placing an order, waiting two weeks for delivery, and then discovering the blinds are a full inch too wide to fit. It’s a deflating experience that is entirely avoidable.
In my experience, the biggest source of measurement problems isn’t carelessness. It’s overconfidence. People assume their windows are square, assume one measurement is enough, and assume the nearest whole inch is close enough. Windows are often none of those things, especially in homes older than a few decades.
What I’ve found actually works is treating the measuring session as its own project. Don’t measure windows in five minutes while doing something else. Set aside 20 to 30 minutes, get the right tools out, and do it properly. The time you invest there will save you hours of dealing with returns, reorders, and installation problems.
I also think more people should use the measuring guides and design support tools available through retailers like Valueblindsdirect before ordering. Not because measuring is impossible on your own, but because a second set of eyes on your numbers is always worth having. Taking your time and documenting everything carefully is the single most important thing you can do for a clean result.
— Sunny
Get your perfect fit with Valueblindsdirect

Once your measurements are locked in and verified, the fun part starts. Valueblindsdirect makes it straightforward to translate your numbers into a custom order. Use the Window Treatment Design Studio to select your style, material, and mounting preference with your exact dimensions in hand. The tool walks you through each decision so nothing gets missed.
Whether you’re looking for cordless blinds that work for renters or motorized shades for a hands-free experience, Valueblindsdirect has a product for every window type and mount style. Expert support is available if your measurements raise any questions before you finalize. Every order is made to your exact specifications, so those numbers you worked hard to get will translate directly into blinds that fit the first time.
Browse the full collection of custom blinds and order with confidence, knowing your measurements are ready to go.
FAQ
What does a blinds measuring guide cover?
A blinds measuring guide covers how to measure window width and height for both inside and outside mount blinds, what tools to use, and how to avoid common errors like rounding measurements or ignoring obstructions.
How many times should I measure my windows for blinds?
Measure the width and height at least three positions each, and then re-measure the entire window a second time on a different occasion to confirm your numbers before placing a custom order.
What is the difference between inside and outside mount measurements?
Inside mount measurements use the exact interior frame dimensions, while outside mount measurements add extra width and height beyond the frame to cover the window fully and block light gaps.
How much extra width should I add for outside mount blinds?
Add 1.5 to 2.5 inches on each side of the window frame for outside mount blinds, giving you 3 to 5 inches of total extra width to prevent light from leaking around the edges.
Do I need a professional to measure my windows for custom blinds?
Most windows can be measured accurately by a confident DIYer following a step-by-step guide. For complex windows, out-of-square frames, or unusual obstructions, professional measurement services reduce the risk of a misfit order.


